Posts tagged nordic
DIY Furniture | Kids Scandinavian Tripod Table
HelloLovelyLiving.com | DIY Furniture - Kids Scandinavian Tripod Table

Please tell me why I would decide to make a table instead of going the simple route and just buy one like normal people do. I'm adding that question to the list of others that seem to escape me because this is one of those projects where I had to stop (on several occasions) to scratch my head and ask myself, what have I gotten myself into!? At the end of the day, it was totally worth it, but let's be honest, getting there was far from a walk in the park.

I now probably have a degree in painting from all of the articles that I devoured and the troubleshooting I went through to complete this project. Little did I know that painting a table is not as basic as it sounds. All I know is that I'm happy to share everything I learned and then some so that this project will be a breeze for you. In other words, I'm happy to have been your guinea pig! That's what DIYs are for, right.

In the mayhem that was this project, I decided that by taking photos, I would probably sabotage myself even more, so I opted not to do so. I do, however have the process down in my memory, so hopefully you don't mind that I don't have any photos of the process to share. 

For starters, it is very very very - and I mean VERY - important to sand down the wood before you proceed with anything. Call me dumb, but I decided that I could just skip that process. Soooo ... long story short, let's just say that I was kicking myself in the butt for it. Another important step is to use primer, then sand, then primer, then sand, and repeat that process until you have a smooth base for your paint. For me, it took several times to achieve a flat surface because I did run into problems with my wood having cracks in it, which I was supposed to fill in with wood putty, but thought I could skip that step as well. 

Since we're on the topic of wood having cracks in it, I also learned (after the fact) that all wood isn't created equal and that certain wood is better for painting and attaining a smooth finish. I did not know this, so I had to deal with the pine that I had already purchased. I don't have anything against pine, but if I had known that there were better options, I probably would have went with those instead so that I didn't have to deal with so many knots and cracks in my wood. Since pine wood has so many knots, you will have to use a primer that will be able to hide them and keep them from peeking through in the future. You may also have to apply wood putty to fill in holes or uneven spots. It was an easy option considering it was pre-cut, but if you want to explore other options, I encourage you to do so.

For the most crucial step - the paint - this is where things got really complicated at first. I decided to use an oil-based paint instead of a water-based paint, in other words, latex paint. An article I read suggested that it was the best choice for tables that receive a lot of use because it stands up to wear very well. What I did not know at the time was that oil-based paint takes longer to dry, can not be washed off of brushes (unless you use turpentine), smells really really bad, can be harmful, and is not eco-friendly! *yikes* So, I learned after the fact that maybe I should've just went with a latex paint, and my life would've probably been way easier and less stressful. 

Seeing that I was able to complete this project (finally) after several weeks due in major part to roadblocks and troubleshooting, I am still so pleased with the outcome, and I'm so proud of it. It was so worth every headache because I learned so much from this project. It's actually a really easy project once you know what you're doing. #notetoself

I just wanted to be completely transparent and honest with you guys beforehand about my experience. If you decide to do this project, here's the step by step of what you need to do to achieve the exact same thing. It'll be way easier for you now that I have all of the techniques figured out and outlined. I do recommend you decide on what type of paint will work best for you, though. If you decide to use latex paint, please do some research first as to how to use it since that's not the paint that I will be using for this project. You'll be surprised as to what a difference a little technique or Google search will do for you and the outcome of your project. 
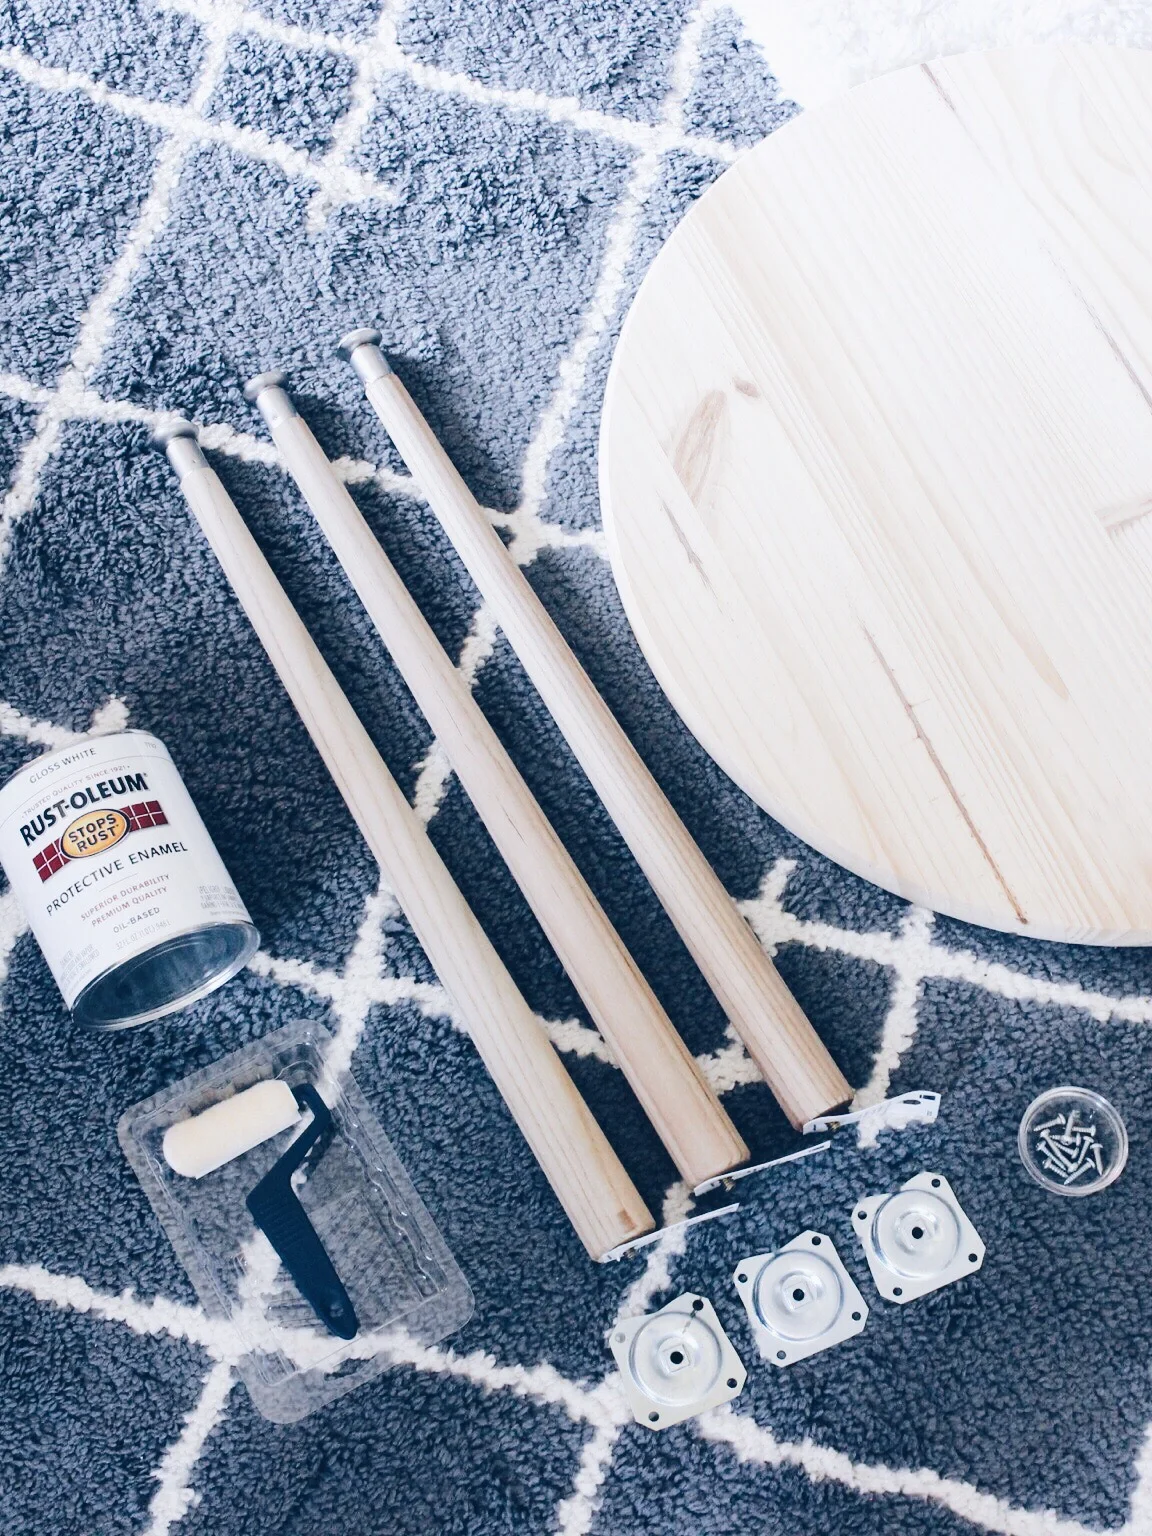
HelloLovelyLiving.com | DIY Furniture - Kids Scandinavian Tripod Table

supplies


HelloLovelyLiving.com | DIY Furniture - Kids Scandinavian Tripod Table

Instructions


I recommend you do this project in an area without a lot of wind, but with good ventilation like a garage. 

Sand

The first thing you'll need to do is to sand the pine wood round to get a smooth base. I would recommend using the 120 grit for rougher areas (the edges of the table), then go over it with the 220 grit paper. For the top of the table, I used the 220 as it is a lot smoother. Remove excess dust with a tac cloth.

Prime & FILL

Spray a thin layer of primer in long strokes with the grain of the wood. Let dry for an hour, then sand with 220 or 120 grit sand paper. Remove excess dust with tac cloth, then repeat steps until you feel like you have a smooth finish. I primed and sanded my table 3 times, but it just depends on your individual results. After the first coat of primer, you will notice that the imperfections will start to show, like scratches, dings, and cracks. If they are not that bad, the primer will fill them in, but if they are deep, you will need to fill them in with wood putty or filler. If you do use wood putty or filler, all you would do is apply it according to the package directions, let it dry, sand smooth, wipe with tac cloth, then add another layer of primer and continue with the process that I've mentioned beforehand.

Paint

The key to getting a smooth finish is to have a smooth base to work with, so I can't stress enough about the importance of sanding as well as removing all dust particles and impurities before you paint. Once you have that covered, you are ready to roll - literally! Working with oil-based paint is a little tricky, but the key to applying it is to not apply it too thick because it will take longer to dry and it will run - oh it will RUN - and you don't want to be like me, stuck sanding it all down again. I learned the hard way.

To apply, use long strokes along the grain of the wood and try not to go over the same spot you painted too many times or it will drag. Since oil-based paint takes longer to dry, it will smooth out, so don't worry too much about getting it completely perfect. I recommend applying paint to the top of the table first, then to the sides of the table (remember, thin coats). Allow your paint to dry completely; dry time will vary by climate. This can take anywhere from 24-72 hrs to weeks, so patience is a virtue here. 

Before you apply your second coat, look for any areas where dust or particles may have entered and sand those areas down with 220 grit sand paper. Completely wipe your table down with a tac cloth to make sure you have a clean surface. To apply the second coat, apply as you did the first. Two coats should be all that you need, but it really depends on your preference. I had to do 3 coats, but that's because I messed up and had to sand down the drips from the second coat I did.

Allow your table to dry for several weeks because the fumes will be strong for a while. Oil-based paint also takes a while to cure, but you can still use it. In the meantime, just be careful not to bang it or it will dent. Once it is fully dry, the finish will cure and harden. 

Legs

For the legs, I do recommend installing them to your table before you apply the polycrylic gloss. To do this, you will need to first measure your table's circumference with string, which will roughly be 75", then cut the string into thirds (25" each). Using the string that you just cut, lay it out along the circumference of the table. At each end, this is where you will mark your spots for where your legs will be installed. Mark your spots at a 4" depth from the edge of the table. Now you can place your top plates on and get to drilling. Make sure that your top plates are angled outward first. It's a simple step that can be overlooked. Mark all four holes on each top plate as a guide, then drill in place. Once that's all done, you can now screw on your legs. 

Now it's time to paint your legs with the polycrylic gloss. I didn't sand mine, but I do recommend you do so to get a smoother finish before you paint. Mine turned out just fine, so it's up to you. Since the polycrylic base is water-based, the wood grain will raise a bit, which you'll either want to sand smooth or you can leave be (which I did). I just used one coat to maintain that natural finish. Let the legs dry for an hour and they're good to go!


HelloLovelyLiving.com | DIY Furniture - Kids Scandinavian Tripod Table

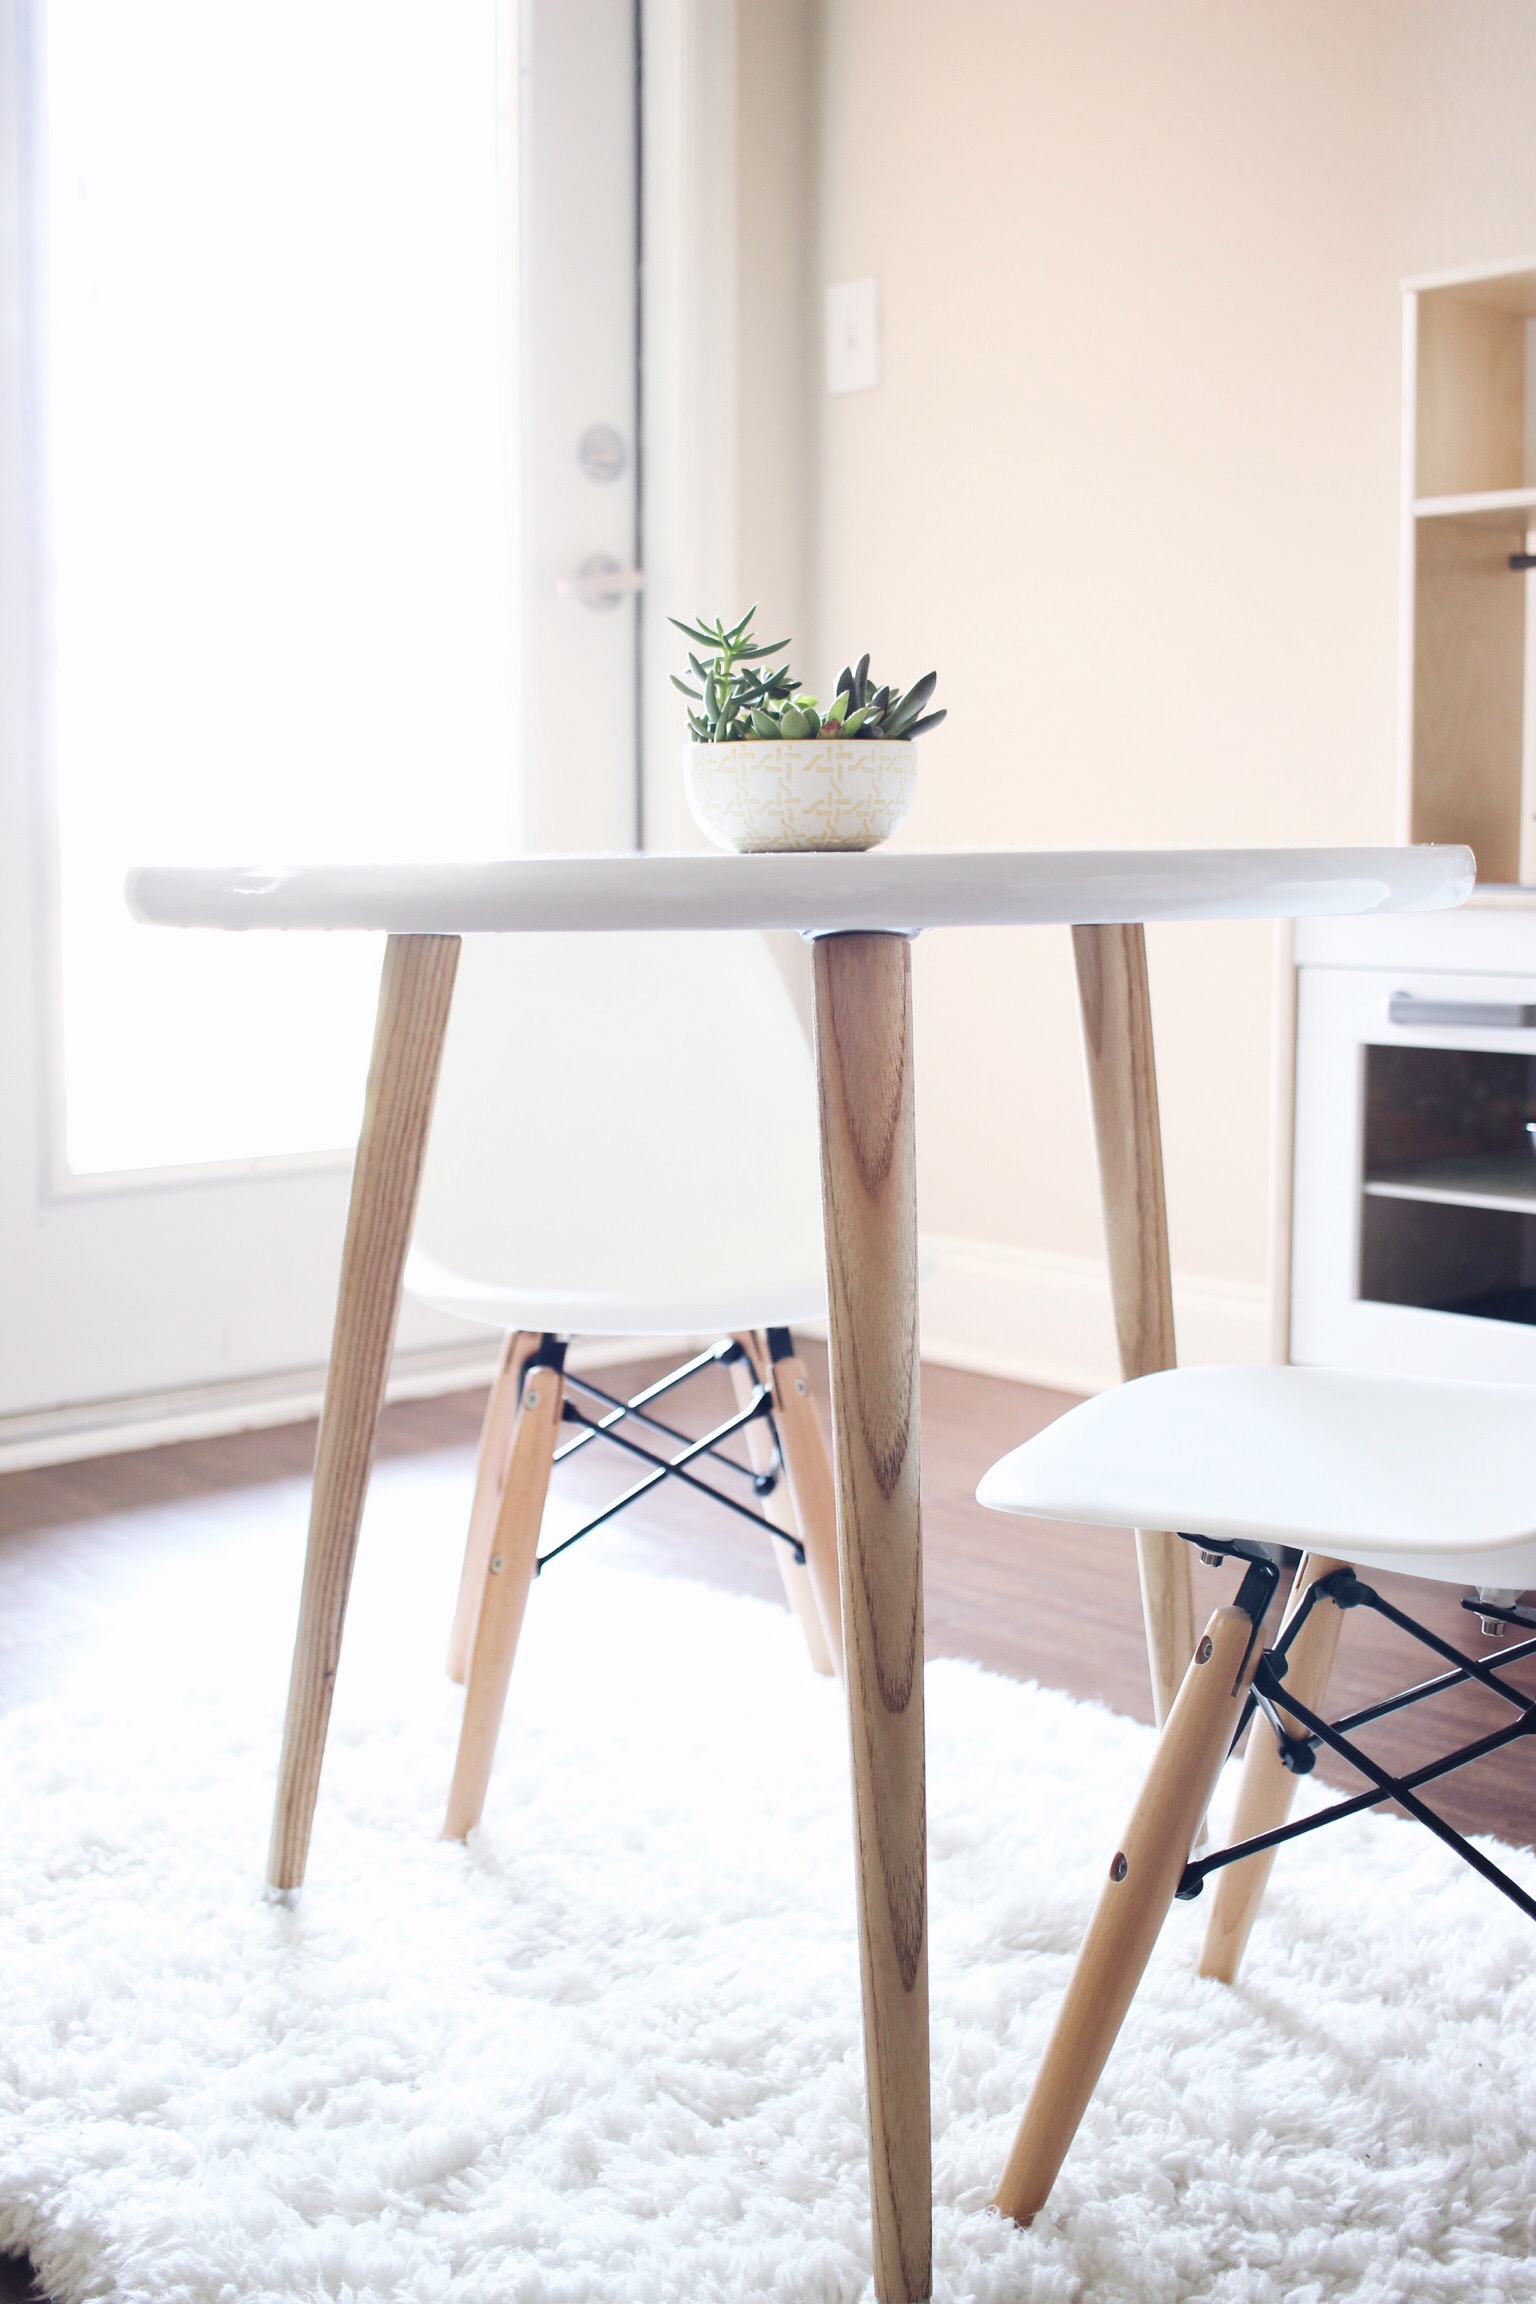
That's a wrap for this project! The play kitchen from Ikea was a nice surprise that I ran into while on my trip to the Dallas location, so I had to snatch it up. I think it looks amazing alongside the table! I am going for a Scandinavian look for his play area and for our home, so it's coming together very nicely. I did have a moment where I was considering going for a Scandinavian whitewashed finish, which also would've been pretty. I was able to find the plastic Eames chairs at Hobby Lobby - and they were on SALE! Big win for me. My small succulent arrangement is perfect for this small-sized table, and Uriah doesn't even mess with it. Don't be scared to use white. These are all materials that are easy to clean up and maintain. Uriah has already drawn on the chairs, and it was a cinch to remove.

HelloLovelyLiving.com | DIY Furniture - Kids Scandinavian Tripod Table

This project was so worth it. I mean, look at this space! I'm in LOVE. Uriah has been enjoying his little setup, and he can finally have his own kitchen to play in. He's all about being in the kitchen with me, so I just had to do this for him.

Do let me know if you try this project out and if you have any questions, I'd love to help. It will be 100% worth every ounce of love and sweat you put into it! 

Did you enjoy this DIY? I'd love to hear your thoughts in the comments below!

HelloLovelyLiving.com | Sharing Is Caring


Moodboard | Modern Nordic and Boho Inspired Outdoor Space

Living in Oklahoma, being outside to enjoy the weather is a luxury. Not only is the weather bipolar, but it is either extremely cold or extremely hot for the most part of the year. In between, we're lucky to enjoy a good day or two during the week that is perfect - and for me, that means weather in the 70s - 80s! 

Now, being that I'm from an island, you can imagine how extreme this can be for me because what I'm used to back home on Guam is one of two things: rain or shine. Guam's two seasons - wet and dry -  means that if the sun isn't out, it's raining, but for the most part it's beautiful year-round. I miss being able to predict the weather almost every day and be able to enjoy outdoor activities. Since I feel serious deprivation, I jump on any opportunity to go to the park or just drive around to enjoy a good, sunny day and warm weather.

One of the things that I've been wanting to do is create a nice outdoor space on my patio so that I can enjoy any good weather on a moments notice. My sons and I enjoy going outside to get fresh air and enjoy the scenery, and we do get a nice view of the sunset, but one thing prevents us from staying outside for too long; The space is empty! I mean, let me elaborate on that. I have no furniture, no chairs, just a small wooden box with a marble slab on top to hold some plants, but that's it! I would show you a picture of it, but seriously, it's that embarrassing. 

It's been on my mind to do something with the space, but I just haven't had the budget to actually make it something worth doing. So, I've been searching for DIY projects on how I can make things myself for pennies of what it would cost to purchase something at the store. I've found a few DIYs, but not many that are simple and that don't require me to have some level of woodworking expertise or following-directions expertise (in my case). Measurements make me nervous.

So, when Douglas Elliman contacted me to be a part of their Florida Room Challenge, it came at the perfect timing. I had just come back from a family vacation from Florida - which I didn't want to come back from - and my patio had been on my mind for quite a while now. They asked me to share how I would style my dream Florida Room so that I could enjoy it year round. Challenge accepted!

What I decided to create was a space inspired by modern nordic and bohemian design. I've been into a cleaner, more minimalist and airy color palette, so I wanted to stick to warm neutrals and white. I didn't want to stick to a traditional beach feel but create something that was more modern, yet very casual and inviting. Take a look at what I put together and I will go further in depth with my choices toward the end of the post.

 
Moodboard | Modern Nordic and Boho Inspired Outdoor Space | HelloLovelyLiving.com
 

1  |  Round Paper Lanterns* | Target

2  |  Sisal Rug* | Kohl's

3  |  Kilim Turkish Cotton Throw* | Terrain

4  |  Ivory Throw Blanket | Layla Grace

5  |  White Wire Chair* | One Kings Lane

6  |  Cactus Garden* | Overstock

7  |  Bertoia Side Chair* | Design Within Reach

8  |  Ferox Aloe | Weylandts

9  |  Whitewashed Wood Wall Mural | Burke Decor

10  |  Macrame Wall Hanging* | Urban Outfitters

11  |  Tribal Pattern Throw Pillow* | Wayfair

12 |  Boston Fern Hanging Basket* | Overstock

13  |  Pear Lantern* | Amara

14  |  Seafarer Medium Lantern* | Zinc Door

15  |  'Morocco' Pillow* | Nordstrom

16  |  Decorative Pillow Sea Foam | Etsy

17  |  Artificial potted cactus | Selfridges & Co.


18  |  Ink Hatch Pillow - Ink* | Casa 

19  |  Cameo Cushion Amethyst* | Houseology 

20 |  Seafarer Small Lantern* | Zinc Door

21  |  Mini Artificial Succulent* | Norsdstrom

22 |  Tealight Lantern* | Amara

23  |  Relax Rope Accent Pillow | Kirklands

24  |  Quilted White Pillow | CB2

25  |  Art Club Concept Cushion | Superette

26 |  Mini Artificial Succulent* | Norsdstrom

27 |  Two Toned Grey Cushion* | Target

28  |  Artificial potted cactus* | Selfridges

29  |  Bungalow Sofa* | Serena & Lily

30  |  Sunshine Accent Chair* | Dot & Bo

31  |  Reversible Uncover Tripod Table* | Amara

32  |  Wire Storage Table* | Luisaviaroma

33  |  Melati Hanging Chair* | Anthropologie

34  |  Macrame Hanging Planter* | Urban Outfitters

 
via Anne Sage


CREATING MY MOOD BOARD

Before I created my mood board, I put together a Pinterest board of all of the outdoor spaces that I wanted to get ideas from, then used those photos to pick out items that I wanted to incorporate into my space. Since this is a "dream" mood board, I kinda went wild with it (a tad overboard), so fair warning that similar items can be found at cheaper prices. I chose each item based on aesthetics, not price, so I do plan on using this mood board as inspiration to find more budget-friendly pieces or ideas for DIY projects.

Here's the breakdown of how I was able to accomplish creating a modern nordic and bohemian inspired space:


2 | PLANTS

On any given day, you can catch me obsessing over plants, so of course, they had to make an appearance in my Florida Room. Boston ferns are the perfect way to add lush greenery and that pop of color in this neutral space. They're also really easy to care for, so they're a perfect choice for me. I also had to include easy to care for succulents and cactus. I say the more plants the merrier, especially when the weather warms up. Bohemian spaces are all about that jungle vibe, so you can't overdo the plants. I'd say skip the fake plants and just go with the real deal. I've found that succulents and cactus are immune to my plant-killing tendencies, so I can't go wrong with them!


4 | NATURAL FINISHES + METALS

Creating a bohemian vibe called for different natural finishes and textures. For example, I chose a variety of finishes like this Sunshine Accent Chair* with a bamboo and wicker seat and this Whitewashed Wood Wall Mural made from reclaimed boards which has a myriad of different textures and stains. I also incorporated lighter shades of wood finishes like this Pear Lantern made from pine wood and this Reversible Uncover Tripod Table* in light ash and brushed metal in aluminum on the opposite side. The Seafarer Medium Lantern* and Seafarer Small Lantern* are made with a variety of natural materials: galvanized metal, fir wood, plywood, bamboo, and jute. I love that it has a gray tone to it, which can be seen repeating in this space. Other natural fibers can be seen in the macrame decor. The tripod legs of the Bungalow Sofa* and Sunshine Accent Chair* are also where that metal comes into play. For more metal on metal action, I chose the Wire Storage Table*, White Wire Chair*, and Bertoia Side Chair* for that clean modern look.


1 | MODERN MACRAME  

I knew that I wanted to add a boho touch to my outdoor space because I love modern macrame, a zillion plants, natural textures and finishes and a relaxed vibe. So, I added this Knotted Melati Hanging Chair* that is macrame perfection. Keeping with the macrame theme, I wanted to also include this Macrame Wall Hanging* that I thought would be perfect as a wall tapestry or to divide the space. Since this is my dream Florida Room after all, I couldn't go without this Macrame Hanging Planter* as well. Hanging plants are a must.


3 | MIX & MATCH SEATING

I wanted to incorporate a lot of seating, so I went in with a white Bungalow Sofa* with hairpin legs. I actually edited the sofa to have hairpin legs, so the sofa seen actually doesn't exist; The original sofa has a rattan base. I'm loving hairpin legs and thought how pretty it would be to use them as legs for a sofa. It would be great for the outdoors because it would be completely open and perfect for small spaces. They're also a good choice for the outdoors because animals or bugs can't hide under them and nest. The platform for the sofa would probably be some type of wood. I also love the look of wire chairs, so I also added those in to touch on the modern nordic feel I was going for. As you can see, since there are so many areas to sit, you can always create separate seating areas and move furniture around to change up the space entirely.


5 | FINISHING TOUCHES

I wanted to make sure to include a lot of lighting so that the space can also be used in the evening, so the lanterns on the ground level add that perfect touch along with the hanging Round Paper Lanterns*. Tons and tons of pillows are a must as well as varying patterns and colors, but keeping with a soft color palette. The Kilim Turkish Cotton Throw* and Ivory Throw Blanket are to keep warm and bundle up to when it gets cold. I also added a Sisal Rug* to complete the space because I love outdoor rugs and how they make a space feel like an outdoor living space. I can definitely see myself enjoying this space. Every. Single. Day. There would be no reason to stay indoors with how comfortable, relaxing, and welcoming it looks!

I think I accomplished what I wanted for this room and more. It's the perfect space for any occasion and it would definitely make me happy on those days where I just want to get some fresh air in the comfort of my third story porch. I love how everything came together and how it really incorporates everything I want in an outdoor space. Thank you to Douglas Elliman for inviting me to be a part of this challenge. If you are on the lookout for amazing properties across the US, be sure to check them out, and if you're in need for some inspiration, head over to their Florida page. When I did, it just reaffirmed why my husband and I want to relocate there. 

I hope this inspires you to create a mood board for your outdoor space. Not only will it help you get all of your ideas together, but it will seriously make your dream space more attainable because it'll make your vision come to life. If you create a mood board, I'd love to see it! 

So, what do you think? How would you decorate your dream Florida Room? I'd love to hear about it in the comments below!

Disclosure: Links that are marked with an * are affiliate links.


The Danish Retailer That May Rival Ikea
The Danish Retailer That May Rival Ikea | HelloLovelyLiving.com

via Bloomingvile

I am completely and utterly obsessed with this Danish company that just hit the US market. In my latest Mode story, I'm getting a bit controversial. It may touch a soft spot for you Ikea lovers. Nonetheless, I am an Ikea lover myself, and that's exactly why I've fallen for this Scandinavian home goods company I'm about to share with you. If you're on top of the minimalist movement, you'll see what I'm talking about. Their products will make you swoon. Now if only they had a store the size of five football fields so I could spend eight hours inside. Read on for the full deets.

Are you an Ikea addict? How many hours could you spend in their store?