Posts tagged chicken
Lemon Roast Chicken with Sage and Thyme

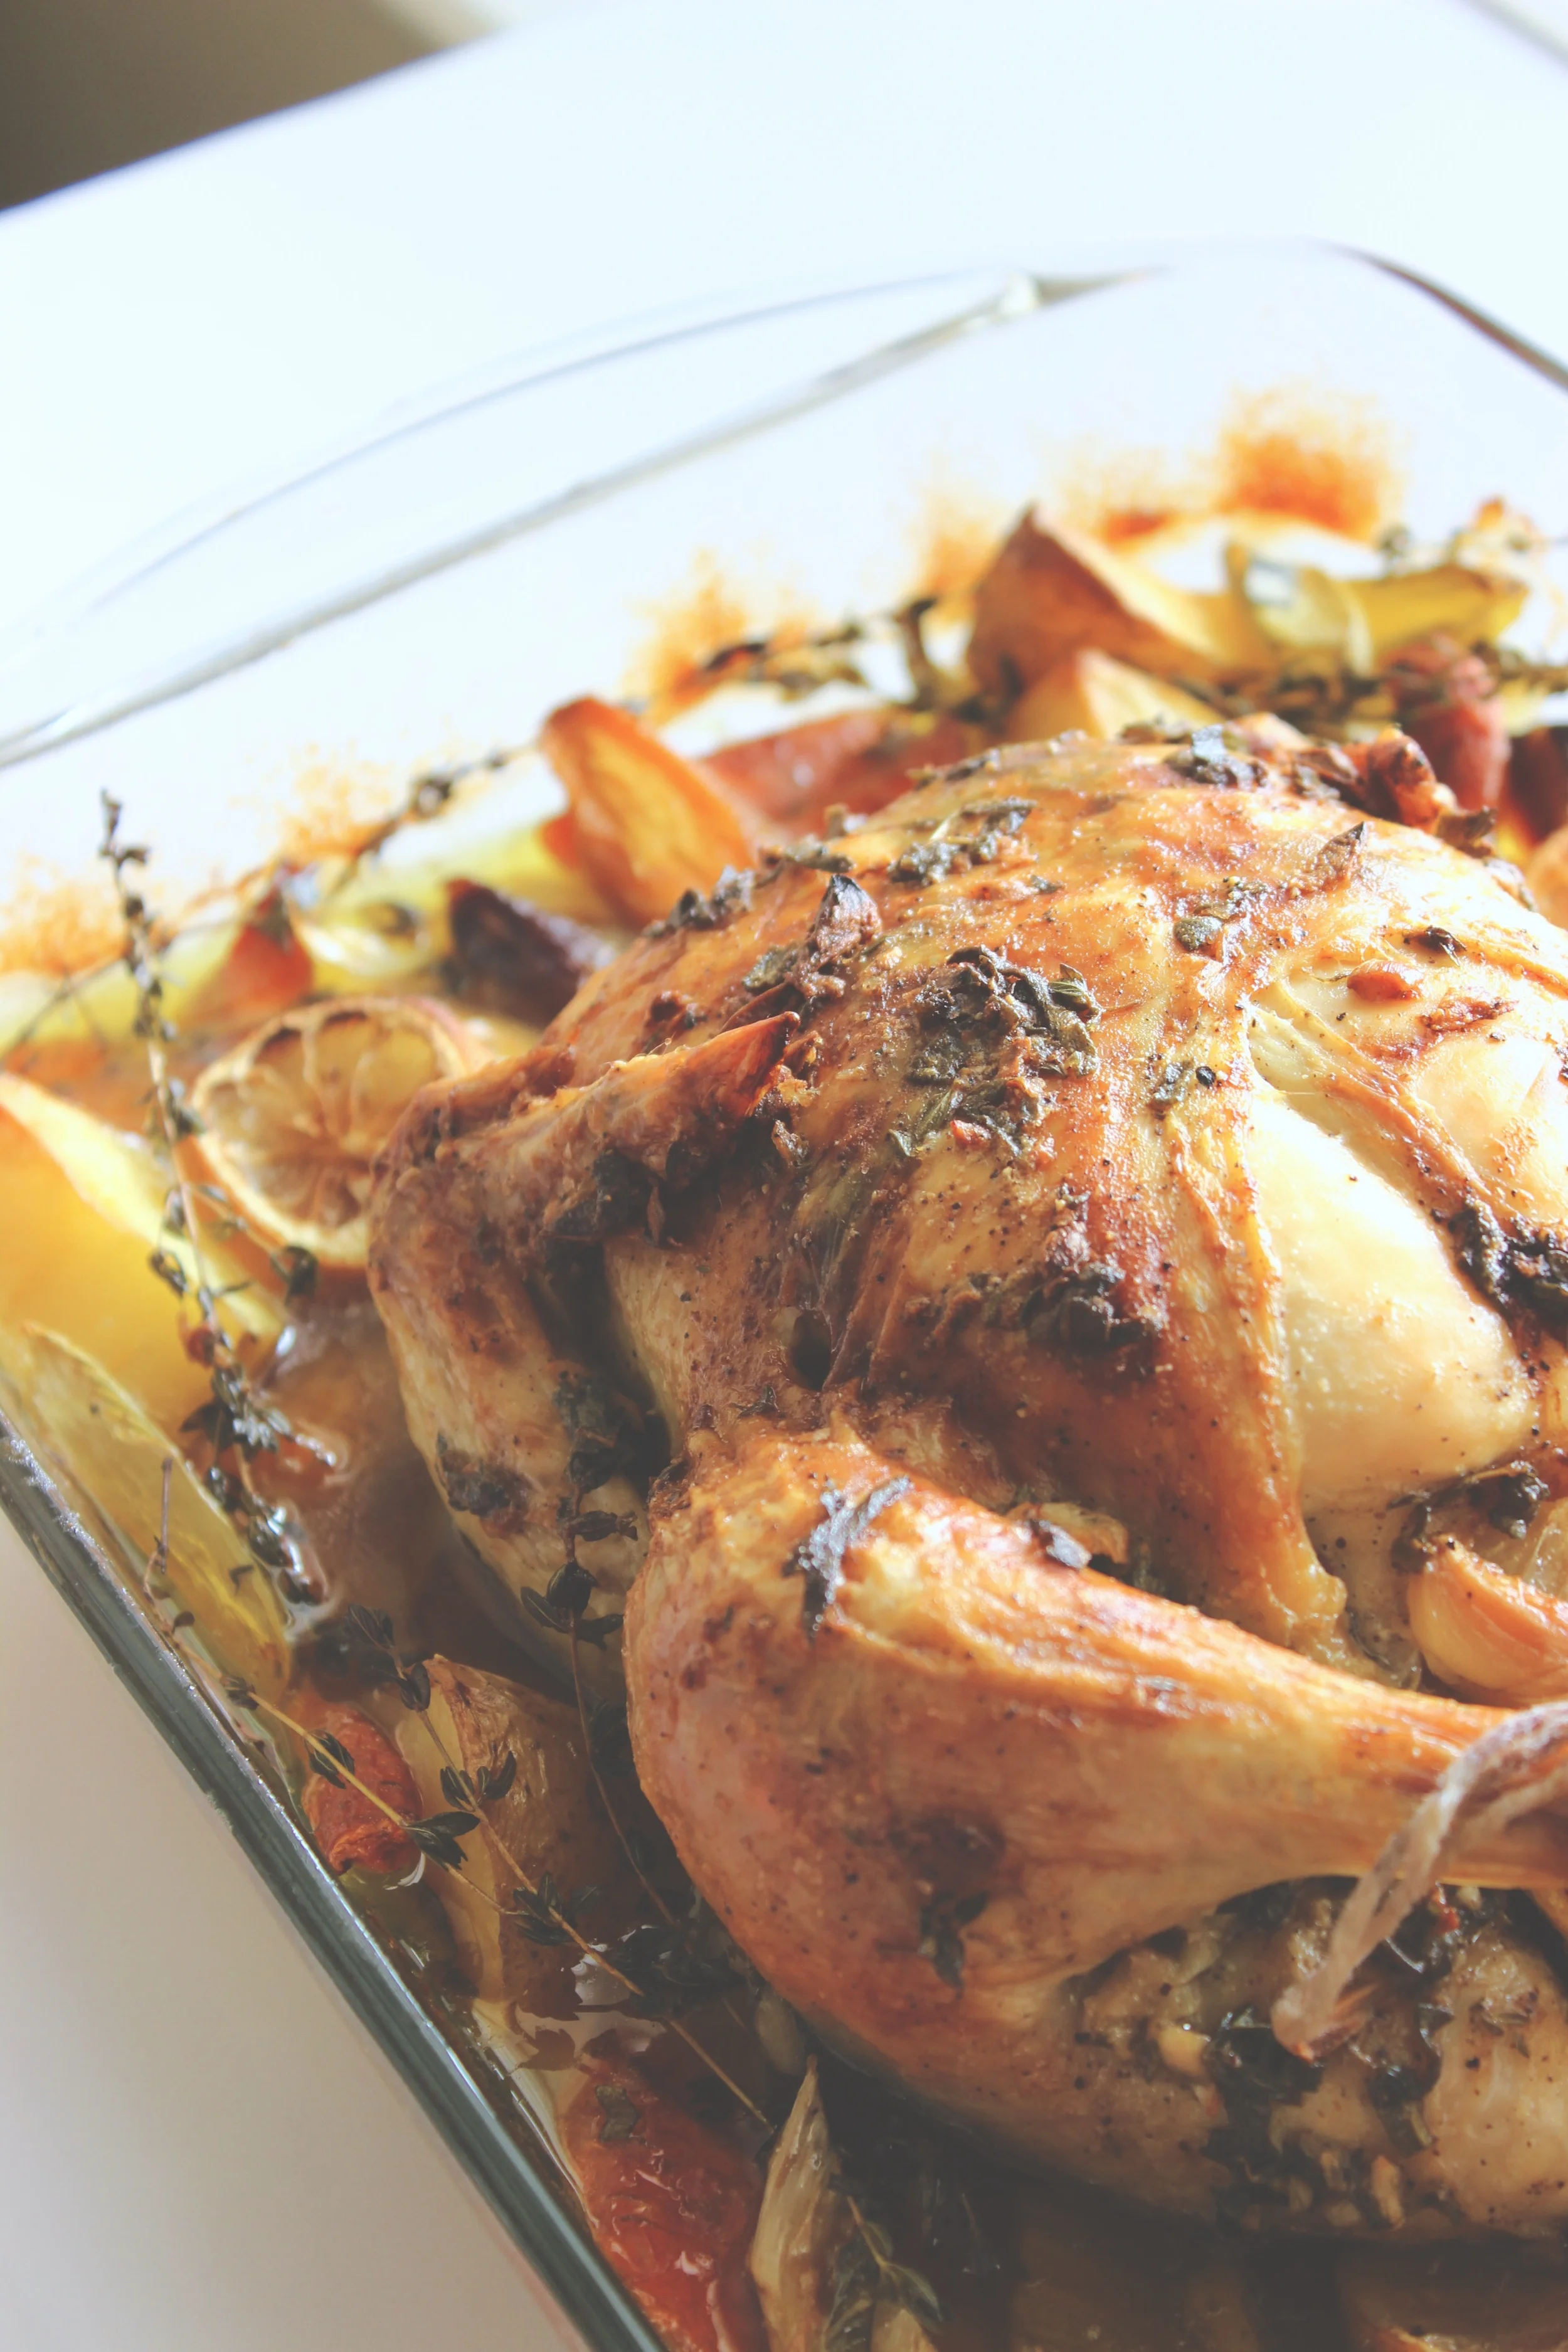
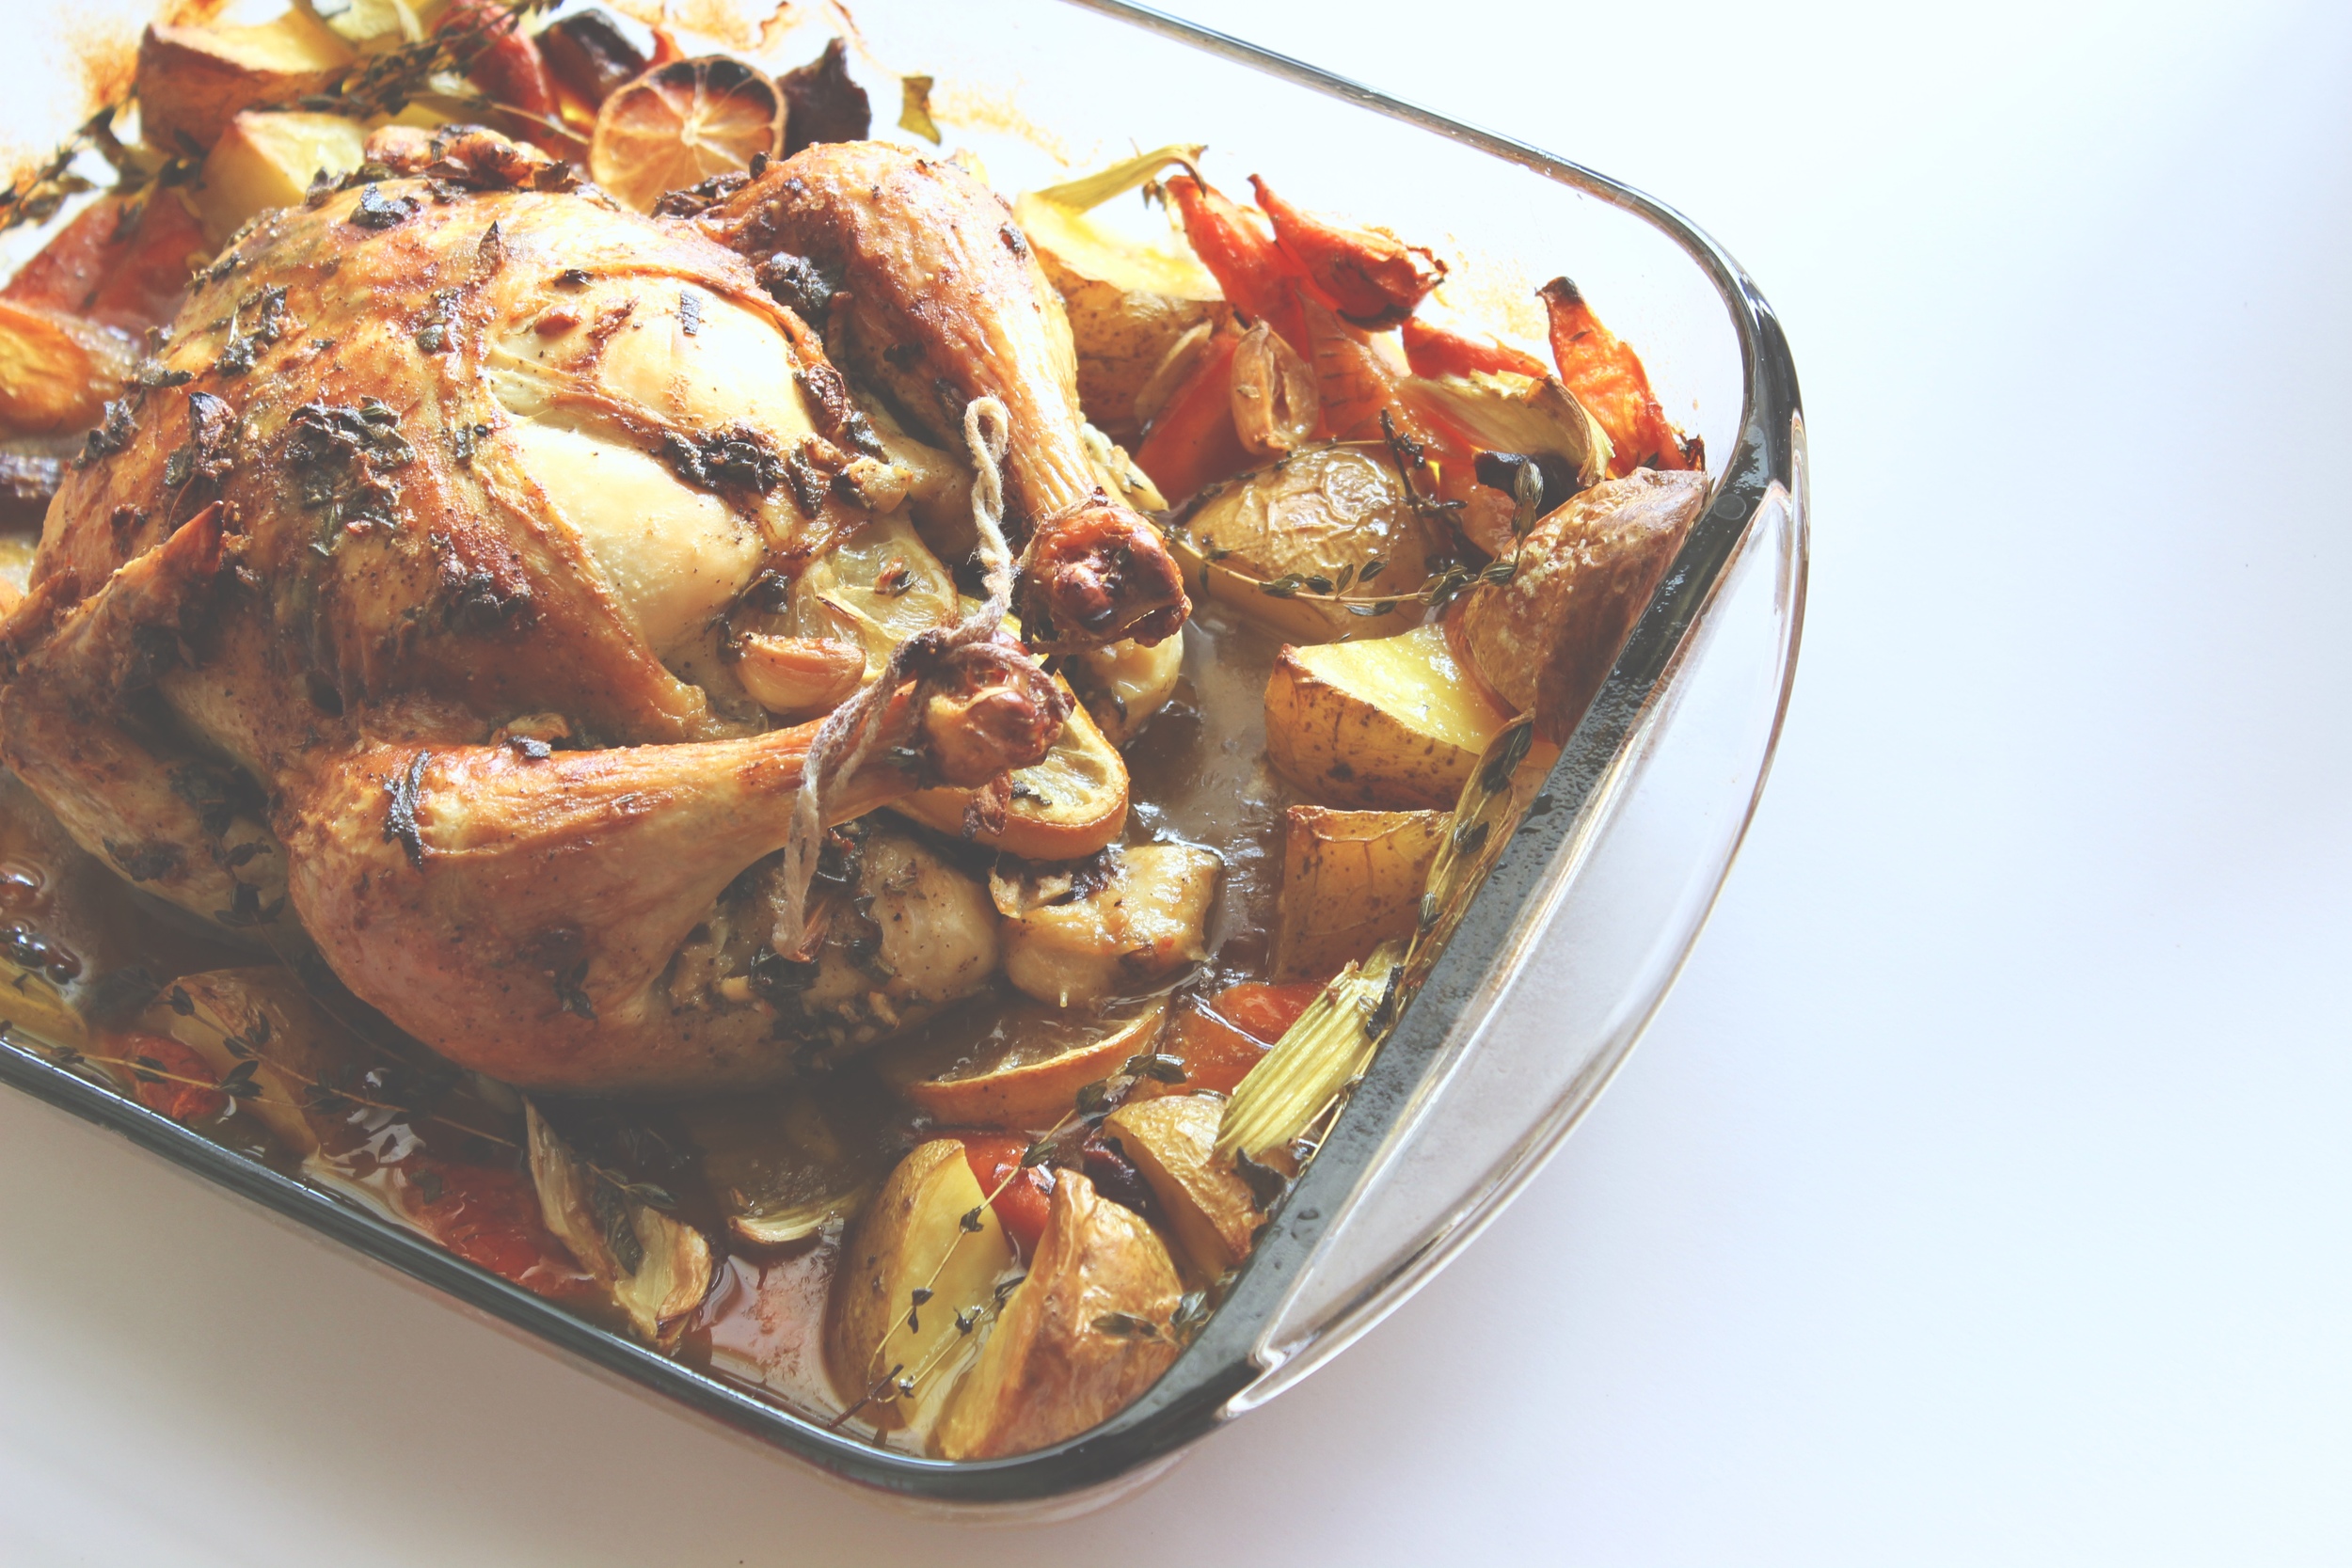
There's nothing like smelling the lovely aroma that come from roasting a chicken and how it fills your entire home with deliciousness.

Lemon Roast Chicken with Sage and Thyme

Days like this are my favorite because I love how effortless and simple it is to create a meal that will last me days and taste phenomenal.

Lemon Roast Chicken with Sage and Thyme

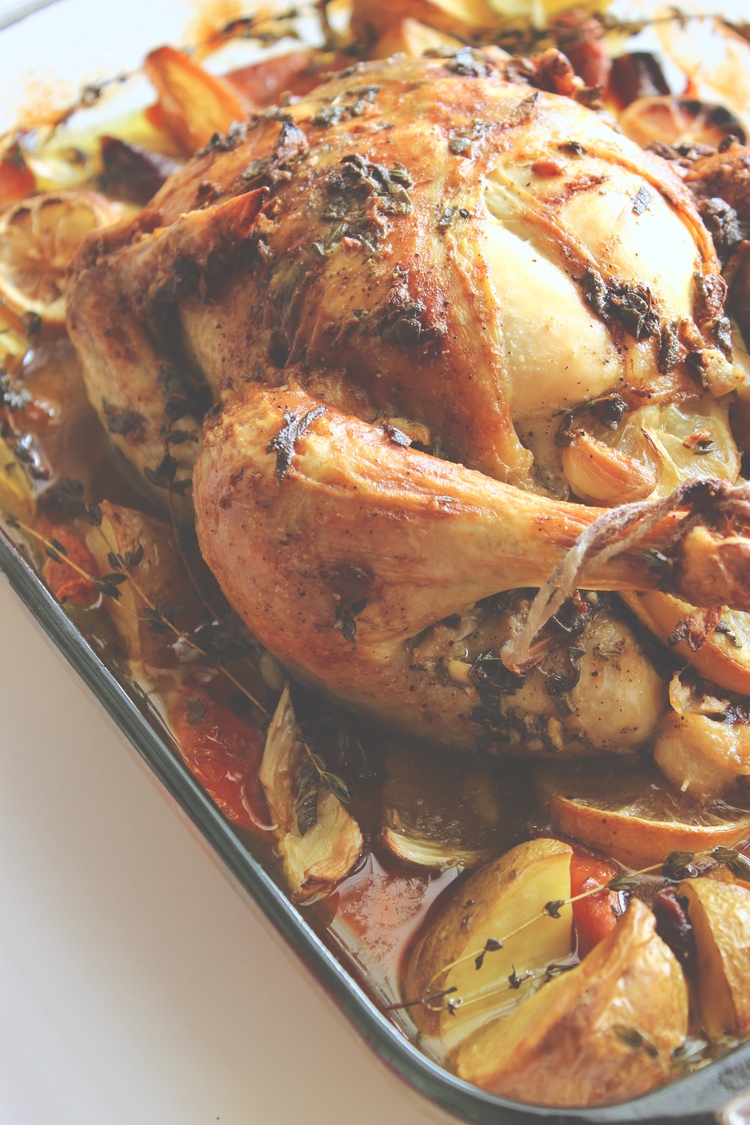
Look out my loves, this is not your average store-bought roast chicken - although I do love those from time to time - it is bursting with fresh flavors of fresh herbs, garlic, and lemon. This recipe is so versatile and can be adapted to suit your taste by switching up the herbs and veggies.

Lemon Roast Chicken with Sage and Thyme

I love making this meal once a week so that I can have leftovers, making life so much easier during those days where I need to prepare a meal quickly.

Lemon Roast Chicken with Sage and Thyme

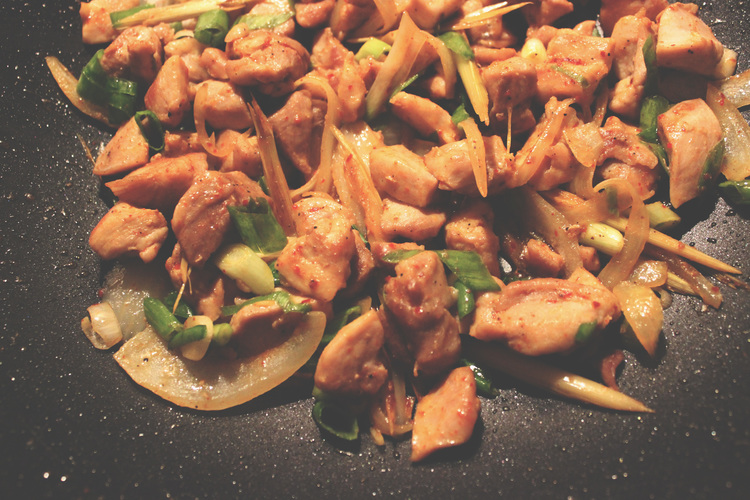
These leftovers will be perfect for chicken kelaguen, a Chamorro recipe from Guam that I grew up on, containing chopped chicken, lemon, peppers, and green onions. It will change your life, so maybe I'll share that next time.

Let's get into this roast chicken recipe! 

Lemon Roast Chicken with Sage and Thyme

Lemon Roast Chicken with Sage and Thyme


Servings: 4-6

Prep: 30 mins

Cook: 2 hrs

Total time: 2 hrs 30 mins


Ingredients

  • 4-5 lb whole natural chicken
  • 3 rainbow carrots, cut into 2" pieces
  • 2 celery stalks, cut into 2" pieces
  • 3 golden potatoes, quartered
  • 2 lemons, sliced
  • 1/2 of a small onion, halved
  • fresh stage and thyme
  • 6 garlic cloves, minced
  • 3 garlic cloves, whole
  • 4 Tbs unsalted butter
  • salt and pepper
  • olive oil
  • Twine to tie drumsticks

Instructions

  1. Preheat oven to 425º. Set carrots, celery, and potatoes into baking dish. Add 5-7 thyme sprigs and 1 Tbsp each of chopped sage and thyme. Drizzle with olive oil and sprinkle with salt. Mix to evenly coat. Add 4 lemon slices. Move veggies to the edges of the dish to create an open space in the center for the chicken.
  2. Prepare the butter rub by combining room temperature butter with 1 tsp salt, 1/2 tsp black pepper, chopped garlic, and 1 Tbsp each of sage and thyme.
  3. Massage butter rub under skin of chicken breasts, then evenly coat the whole chicken. Use remaining butter to coat chicken cavity. Stuff chicken cavity with onions, whole garlic, and lemons. Tie legs with twine to retain shape.
  4. Place chicken in oven and roast for 30 minutes at 425º.
  5. Reduce heat to 350º and bake for 1 hour 30 minutes. After an hour, check temperature and monitor until thermometer reads 190º at thigh. Once it reads 190º, it is done.
  6. Remove chicken from oven and let rest before cutting.

Notes

  • Depending on the type of chicken you use will determine how moist your chicken turns out. I recommend using a natural chicken without any added water or solution.
  • Baking time will vary, so a thermometer helps to determine exactly when your chicken is cooked.

This roast chicken recipe is the perfect go-to when you just want to throw something together and let the oven do the work for you. Using fresh, organic ingredients also makes a huge difference in flavor. I used a natural chicken that was free of antibiotics, hormones, and fed a veggetarian diet. The chicken was so moist and juicy and loaded with flavor. I really hope you get to try it out! 

What are your favorite chicken recipes? I love trying new recipes. Share with me in the comments!


Panko Crusted Parmesan Drumsticks

When that craving for something crispy, crunchy, and fried hits, what's a girl to do? I have little self-control when it comes to anything fried, so after indulging, regret usually sets in and I wish I had something healthy instead - like a salad! Isn't it funny how that works? In order to want something healthy, I have to eat something not so healthy. I guess it's my way of saying sorry to my body? Hahaha! Anyway, fried-anything is horrible to eat, unless you use healthy fats to fry with, such as coconut oil, but I have yet to go to those lengths, so on to the next best thing - baked!

Panko Crusted Parmesan Drumsticks

Here's an easy recipe that will allow you to cure your fried chicken cravings; they may not be saturated in all that deliciously yummy fat and oil, but that's the goal, right! Since these are a healthier option, help yourself to as many pieces as you want, without the guilt.

Panko Crusted Parmesan Drumsticks

If you're not familiar with panko, they are japanese-style breadcrumbs that are light and airy because they are made from bread without crusts. They remain crisper longer because they don't absorb a lot of grease. That is why they are also great for deep frying.

Panko Crusted Parmesan Drumsticks

So, the fun part - let's dive into the recipe! I'm getting hungry just typing this (I think it's time for lunch)! Thankfully I have these in my refrigerator from last night. These are great for re-baking because they will crisp back up in a few minutes. So, a big batch and leftovers is a good thing!

Panko Crusted Parmesan Drumsticks


Servings: 5

Prep: 15 mins

Cook: 45 mins

Total time: 1 hr


Ingredients

  • 10 chicken drumsticks
  • 2 eggs
  • 2 Tbs water
  • 2 cups panko breadcrumbs
  • 1/2 tsp onion powder
  • 1/2 tsp garlic powder
  • 1/2 tsp sea salt
  • 1/2 tsp black pepper
  • 4 Tbsp grated parmesan cheese
  • Olive oil

Instructions

  1. Preheat your oven to 425°. Prepare a baking sheet lined with parchment paper and set aside.
  2. Place the eggs and water into a flat dish and beat until well combined.
  3. Place all dry ingredients into a flat dish and mix well.
  4. Individually coat drumsticks with egg mixture, then with dry mix and press firmly to help it stick. Coat drumsticks a second time with egg mixture, then dry mixture. Set on the prepared baking sheet.
  5. Evenly drizzle olive oil over top. Bake for 30-45 minutes. Watch closely after 30 minutes as the crust will start to brown. Remove once it is golden brown.
  6. Let cool for 5 minutes, then serve immediately.
  7. Enjoy with a side salad and brown rice!


I hope you get to try this recipe - it's so simple to make. Set it and forget it. I love baking because it's so effortless and all of those delicious flavors get concentrated into the food. There's also less cleanup to do - who doesn't love that! If you want to pair this with a salad, try my Japanese Salad Dressing inspired by a favorite restaurant of mine back home (seen in the photo). It tastes utterly delicious paired with this recipe. To happy tummies everywhere! Enjoy : ) 

xo stina


Lemongrass Chicken
Lemongrass Chicken Recipe

At my house, I always like to make diverse recipes from different cuisines and cultures. Tonight it just happened to be Vietnamese. I basically love all asian foods and dream to someday travel to Asia and delve into the street food scene where I could really taste the authentic stuff straight from the locals while experiencing all the sights and sounds around me. 

I stumbled upon making this recipe by what I remember this dish tasting like back home on Guam. Where I'm from, it's a melting pot of all types of cuisine, so I had the pleasure of enjoying so much of it and being so spoiled! Now that I am in the mainland, it's harder to come by those tastes that I was so used to back home. I've had to learn how to make the dishes that I love, so I am grateful that there are a few asian markets here where I can find almost anything I need.

Lemongrass Chicken Recipe

Lemongrass Chicken can be found at most Vietnamese and/or asian restaurants. The lemongrass gives it a beautiful aroma and mild taste. The star here, though, is the red pepper powder. It has a mild taste, so you can easily control the heat. Korean pepper powder can be found at most asian markets, but make sure to purchase the right one, as there are different types available that look the same, but aren't. I include links below to the asian ingredients that you may not find locally. Let's get started!


Lemongrass Chicken


Servings: 3

Prep: 10 mins

Cook: 15 mins

Total time: 25 mins


Ingredients

  • 3 chicken thighs (bone and skin removed)
  • 1/2 yellow onion, sliced
  • 2 stalks green onions, chopped
  • 3 stalks lemongrass
  • 2 Tbsp fish sauce
  • 1-2 tsp Korean red pepper powder
  • 2 Tbsp olive oil
  • 1/4 tsp each salt and pepper

Instructions

  1. Chop chicken thighs into 1"x 1" cubes. Cut lemongrass at a diagonal into 2" pieces.
  2. On medium high heat, in a wok, add olive oil and lemongrass and saute until arromatic and slightly browned.
  3. Add chicken and sprinkle with salt and pepper. Let the chicken cook without constantly turning it, so it can get nicely browned, about 5 minutes on each side before flipping. Do this for each side until all sides are nicely browned and carmelized.
  4. Add onions and saute for 2 minutes, then add fish sauce and cook for another 2 minutes.
  5. Add red pepper powder and stir to evenly coat the chicken. Cook for 2 minutes.
  6. Turn off heat and sprinkle green onions on top and combine.
  7. Enjoy with steamed, whit rice.

Lemongrass Chicken Recipe

Easy, huh? This recipe can be whipped up in no time and tastes just like restaurant quality. If you like things on the spicier side, just add more pepper powder. I hope you can try it out! 

xo stina


Chicken Estufao or Chicken Adobo
Chicken Estufao / Chicken Adobo

This is one of those recipes that can instantly take me back home and comfort me when I get homesick. The ultimate comfort meal. I titled it Chicken Estufao in homage to my Chamorro culture, but this recipe is very much the same as the filipino dish, Chicken Adobo, so I included both. I like my Estufao/Adobo on the sweeter side, so I love to add sugar. My husband likes it on the salty/savory side, but he approves, so everyone wins - not too sweet and not too salty. I love me some garlic, so no skimping here. This dish pairs perfectly with steamed, white rice. Upon simmering, a delicious sauce will come together at the bottom of the pan. Drizzle over your steamed rice and there you have the perfect meal to satisfy all your salty/savory/slightly sweet desires.

Chicken Estufao / Chicken Adobo

There are many variations to this dish, but the main ingredients are soy sauce and vinegar. You can use apple cider vinegar in place of regular vinegar or add in some peppercorns for a deeper peppery taste! Remember, cooking should be fun and flexible. So, have fun with it!


Chicken Estufao or Chicken Adobo


Servings: 3-4

Prep: 15 mins

Cook: 30 mins

Total time: 45 mins


Ingredients

  • 2 lbs chicken thighs (bone-in)
  • 4 medium carrots, quartered
  • 1/2 yellow onion, sliced
  • 6 garlic cloves, minced
  • 2 stalks green onions
  • 1/3 cup soy sauce
  • 1/3 cup vinegar
  • 3 Tbsp brown sugar
  • 2 bay leaves
  • 1/4 tsp pepper

Instructions

  1. Place all ingredients in a saute pan except the carrots and green onions.
  2. Bring to a simmer on medium heat. Simmer for 15 minutes.
  3. Add carrots and simmer for another 15 minutes.
  4. Turn off heat and sprinkle green onions on top.
  5. Enjoy with steamed, white rice.

Notes

  • Potatoes can also be added to the dish.
  • I like using chicken thighs (bone-in) because they add more flavor to the dish, but you can use boneless chicken thighs, drumsticks, or even pork if you wish.

I hope you enjoy this recipe just as much as I do! Let me know if you try this recipe, or if you are already a fan of this dish, how do you like yours? What is unique to how you prepare yours? 

xo stina


Chicken and Asparagus Ranch Thin Crust Pizza
Chicken & Asparagus Ranch Thin Crust Pizza

I've always been a little intimidated about making pizza -- mainly the thought of making pizza dough from scratch.  I mean, they make it look so fun and easy on TV, but I'm still not convinced about the dough part. One day I will try my hand at it, but until then, thankfully, there are these pre-packaged crusts that I found at Target. I usually get grossed out about the thought of pre-packaged pizza crusts, but these actually looked good. The best part is that they are ultra thin and crispy -- my fave! So, I decided to try them out for the first time, and I am so glad I did! These are amazingly good and crispy, and they are so much better than take-out. I wanted to do a chicken and ranch style pizza, but I realized it needed some pizzaz (in the form of veggies), so I decided to add some asparagus. Perfect -- I already had some sitting in my refrigerator! What resulted was this delicious, gourmet-looking pizza that reminded me of pizza from California Pizza Kitchen. I can't wait to make this again and try other toppings. Turns out, making pizza this way was fun and easy!


Chicken and Asparagus Ranch Thin Crust Pizza


Servings: 3

Prep: 10 mins

Cook: 20 mins

Total time: 30 mins


Ingredients

  • 2 ultra thin and crispy pizza crusts (pre-packaged)
  • 2 chicken breasts, chopped into 1" pieces 
  • 2 cups asparagus, chopped into 1" pieces
  • 1 cup mozzarella cheese, shredded
  • Ranch dressing
  • 1 oz cream cheese
  • 1 Tbsp butter
  • 2 cloves garlic, minced
  • 1/4 Tsp dried basil
  • 2 Tbsp olive oil
  • Salt and pepper to taste

Instructions

  1. Preheat oven to 400°.
  2. Season chicken with salt and pepper, then sauté in olive oil until browned on the edges.
  3. Add butter into the pan and let melt, then add garlic. Sauté for 2 minutes, then add in cream cheese. Stir until chicken is completely coated. Add basil and stir well. Set aside.
  4. Take 1 pizza crust and evenly sprinkle 1/2 cup of mozzarella cheese, 1/2 of the cooked chicken, then 1 cup of asparagus. Drizzle ranch dressing on top -- once horizontally, then once vertically to evenly coat the pizza. Repeat the same steps with the other pizza crust. 
  5. Bake for 10-12 minutes, until crisp along the edges.
  6. Enjoy!

Notes

  • If you want to be even more fancy, try grilling your chicken instead! I wanted to grill mine, but doing so in the dead of winter was just not an option for me. Haha!

With how easy and simple this was to make, I am inspired to make pizza a regular part of my household menu. Pizza is so versatile. Create any type of flavor combination and never get bored again. Plus, homemade is always healthier. Happy Eating! 

Follow @hellolovelyliving on Instagram and see what else is cooking in my kitchen! 

Have you tried making pizza from scratch or semi-homeamde before? Let me know in the comments!

xo, stina


Nagoya Fried Chicken Wings
Japanese Nagoya Fried Chicken Wings

I first experienced the most out-of-this-world chicken wings at a Japanese restaurant on Guam, which immediately became one of my favorite restaurants for authentic Japanese cuisine. Tucked away in the heart of Tumon, but not as well-known as other Japanese restaurants, Wara was like a hidden gem and a mini Japan getaway. My husband and I enjoyed many date nights there -- watching Japanese game shows and admiring the walls decorated with Japanese keepsakes. I just HAD to have these every time I ate there! After all, who can resist something so crispy with a coating of salty, sweet glaze and topped with crunchy sesame seeds!? These wings are addicting, so proceed with caution! 


Japanese Nagoya Fried Chicken Wings


hello lovely living

Servings: 3-4

Prep: 10 mins

Cook: 40 mins

Total time: 50 mins


Ingredients

  • 2 lbs chicken wings
  • Potato starch
  • Oil for deep frying
  • White sesame seeds
  • Salt and black Pepper

Glaze Ingredients

  • 1/3 cup mirin
  • 1 1/2 Tbsp sake (sub. white wine)
  • 2 Tbsp soy sauce
  • 1/4 cup sugar
  • 1/2 tsp garlic powder
  • 1/2 tsp ginger powder
  • Pinch of salt

Instructions

  1. In a small saucepan, bring the ingredients for the glaze to a boil. Reduce heat to medium low and simmer for 15 minutes, or until sauce has thickened to form a glaze. Set aside when done.
  2. Pat chicken wings dry with paper towels to remove any excess moisture. Coat evenly with potato starch and sprinkle with a dash of salt.
  3. Deep fry wings in oil until they are crispy and golden brown - about 7-8 minutes. Drain well and let cool.
  4. Place wings in a container and drizzle evenly with glaze, then cover and shake until well coated. Sprinkle evenly with sesame seeds and sprinkle with black pepper.

Notes

  • Serve with steamed, white rice.

Enjoy!

Itadakimasu いただきます ! (Let's eat!)