Posts tagged hyperpigmentation
DIY Exfoliating Body Bars

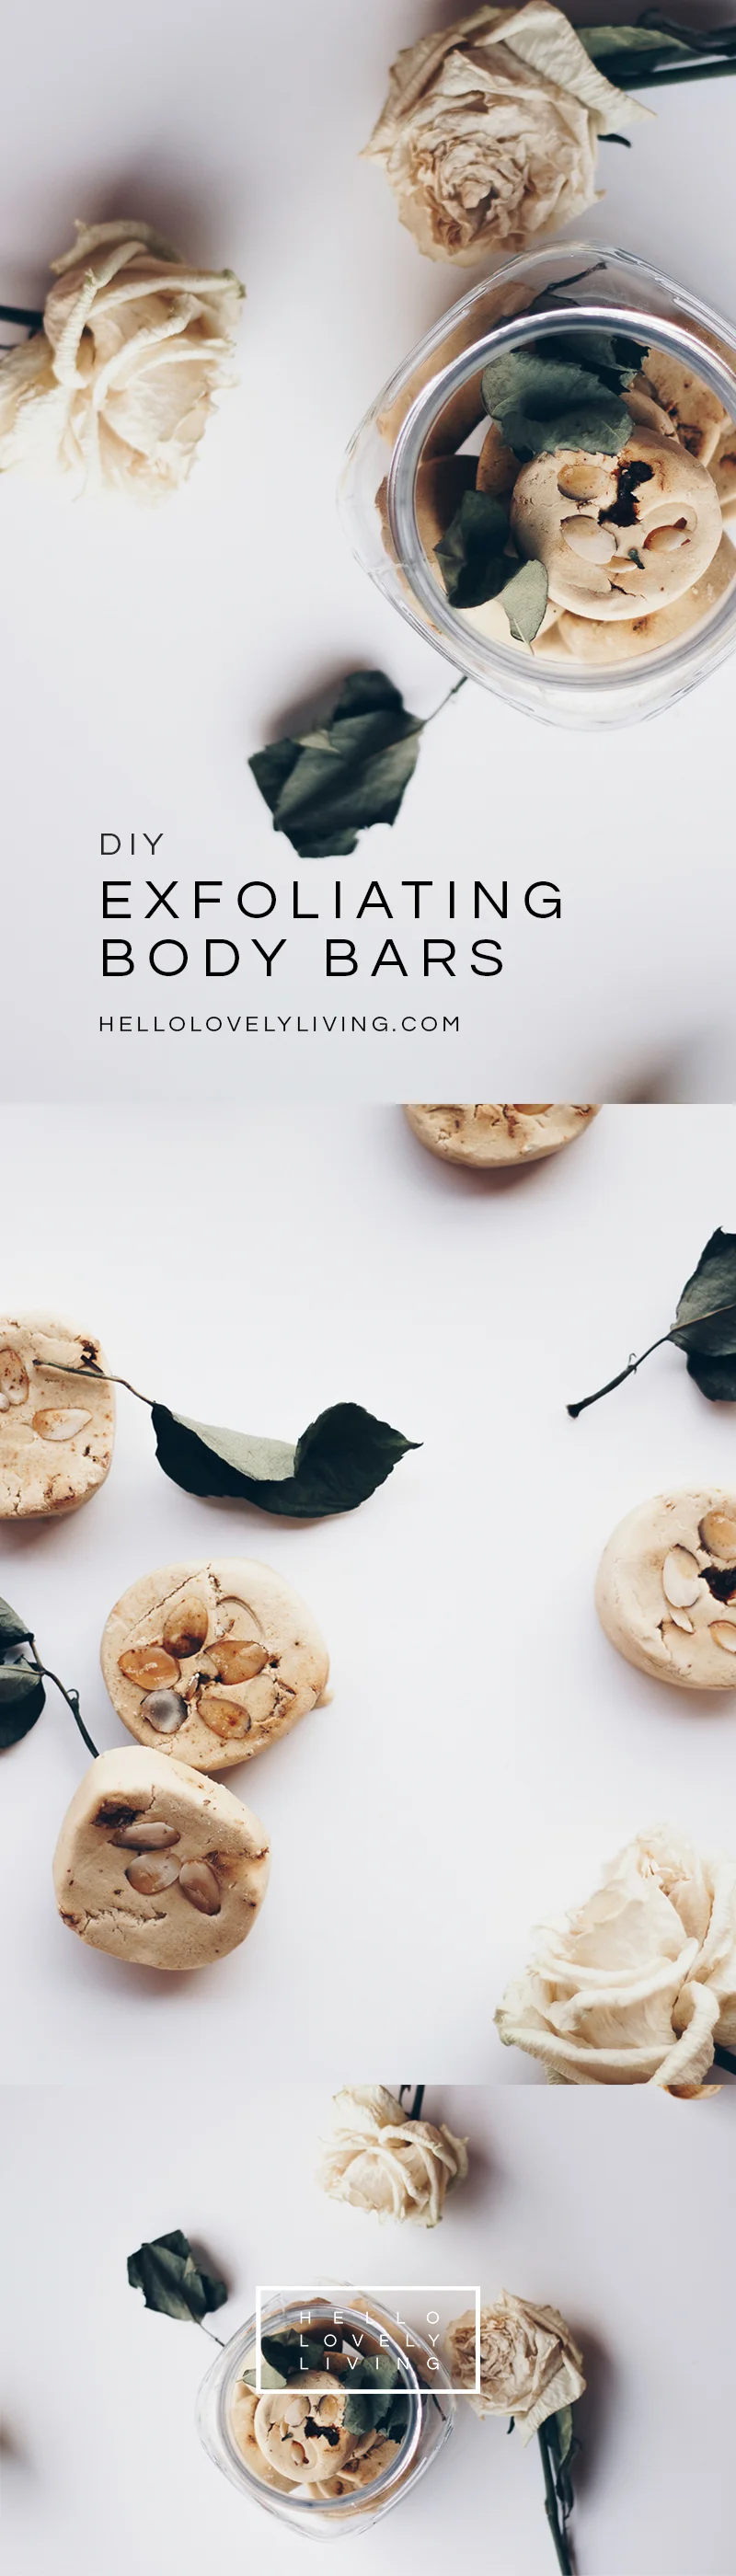
I'm all about these exfoliating body bars lately, and since my recipe makes a ton of them, I'm not running out anytime soon! Truth be told, this recipe was born from a failed attempt at making bubble bars, which I'm not complaining about! I absolutely love these. Read on for the full DIY recipe, and get you some smooth skin!

 
HelloLovelyLiving.com | DIY Exfoliating Body Bars
 

By far, the best part about these exfoliating bath bars is making them! It's so therapeutic making your own skincare products. I mean, it's like baking, but better. Why? Because you don't have to worry about messing up and getting everything exact! It's all about experimenting and having fun.

When you make your own skincare, it takes you back to the basics and allows you to create something for you. We've got to remember that skincare is very personal, so put your heart into it and make it specific to your needs.

For this recipe, I totally was flexible with the ingredients that I used. I didn't freak out that I didn't have certain ingredients. I just used what I had on hand. That's what I recommend you do, too! I've been researching ingredients for a while now and their skincare benefits, so it's easy for me to look into my cabinet and find what I want for a specific result that I want. I suggest you get into researching natural ingredients and their benefits online and incorporate and experiment with them in your skincare routine.

 
HelloLovelyLiving.com | DIY Exfoliating Body Bars
 

The purpose of these exfoliation bars is to exfoliate the areas of the body that get neglected. Real talk: I'm mainly talking about the crevices of the body where the sun don't shine! Armpits/underarms, inner thighs, bikini area, inner elbows, inner knees. It can also be used on any other parts of the body where you want to stimulate new skin cell production and turnover. I also have used them on areas where I have stretch marks to do just that. These exfoliating bars really smooth the skin in a way that normal cleansing can't.

The areas that I had mentioned earlier are generally prone to hyperpigmentation AKA discoloration and buildup of melanin. This can all be prevented or reversed with regular exfoliation and proper cleansing of the areas. Buildup can come in the form of dead skin, oil, dirt, and product buildup (as is the case with deodorant), so frequently taking an exfoliating bar to the skin is going to help to remove all of that junk and keep it youthful and bright. I keep one in the shower at all times and use it during every shower.


HelloLovelyLiving.com | DIY Exfoliating Body Bars
 

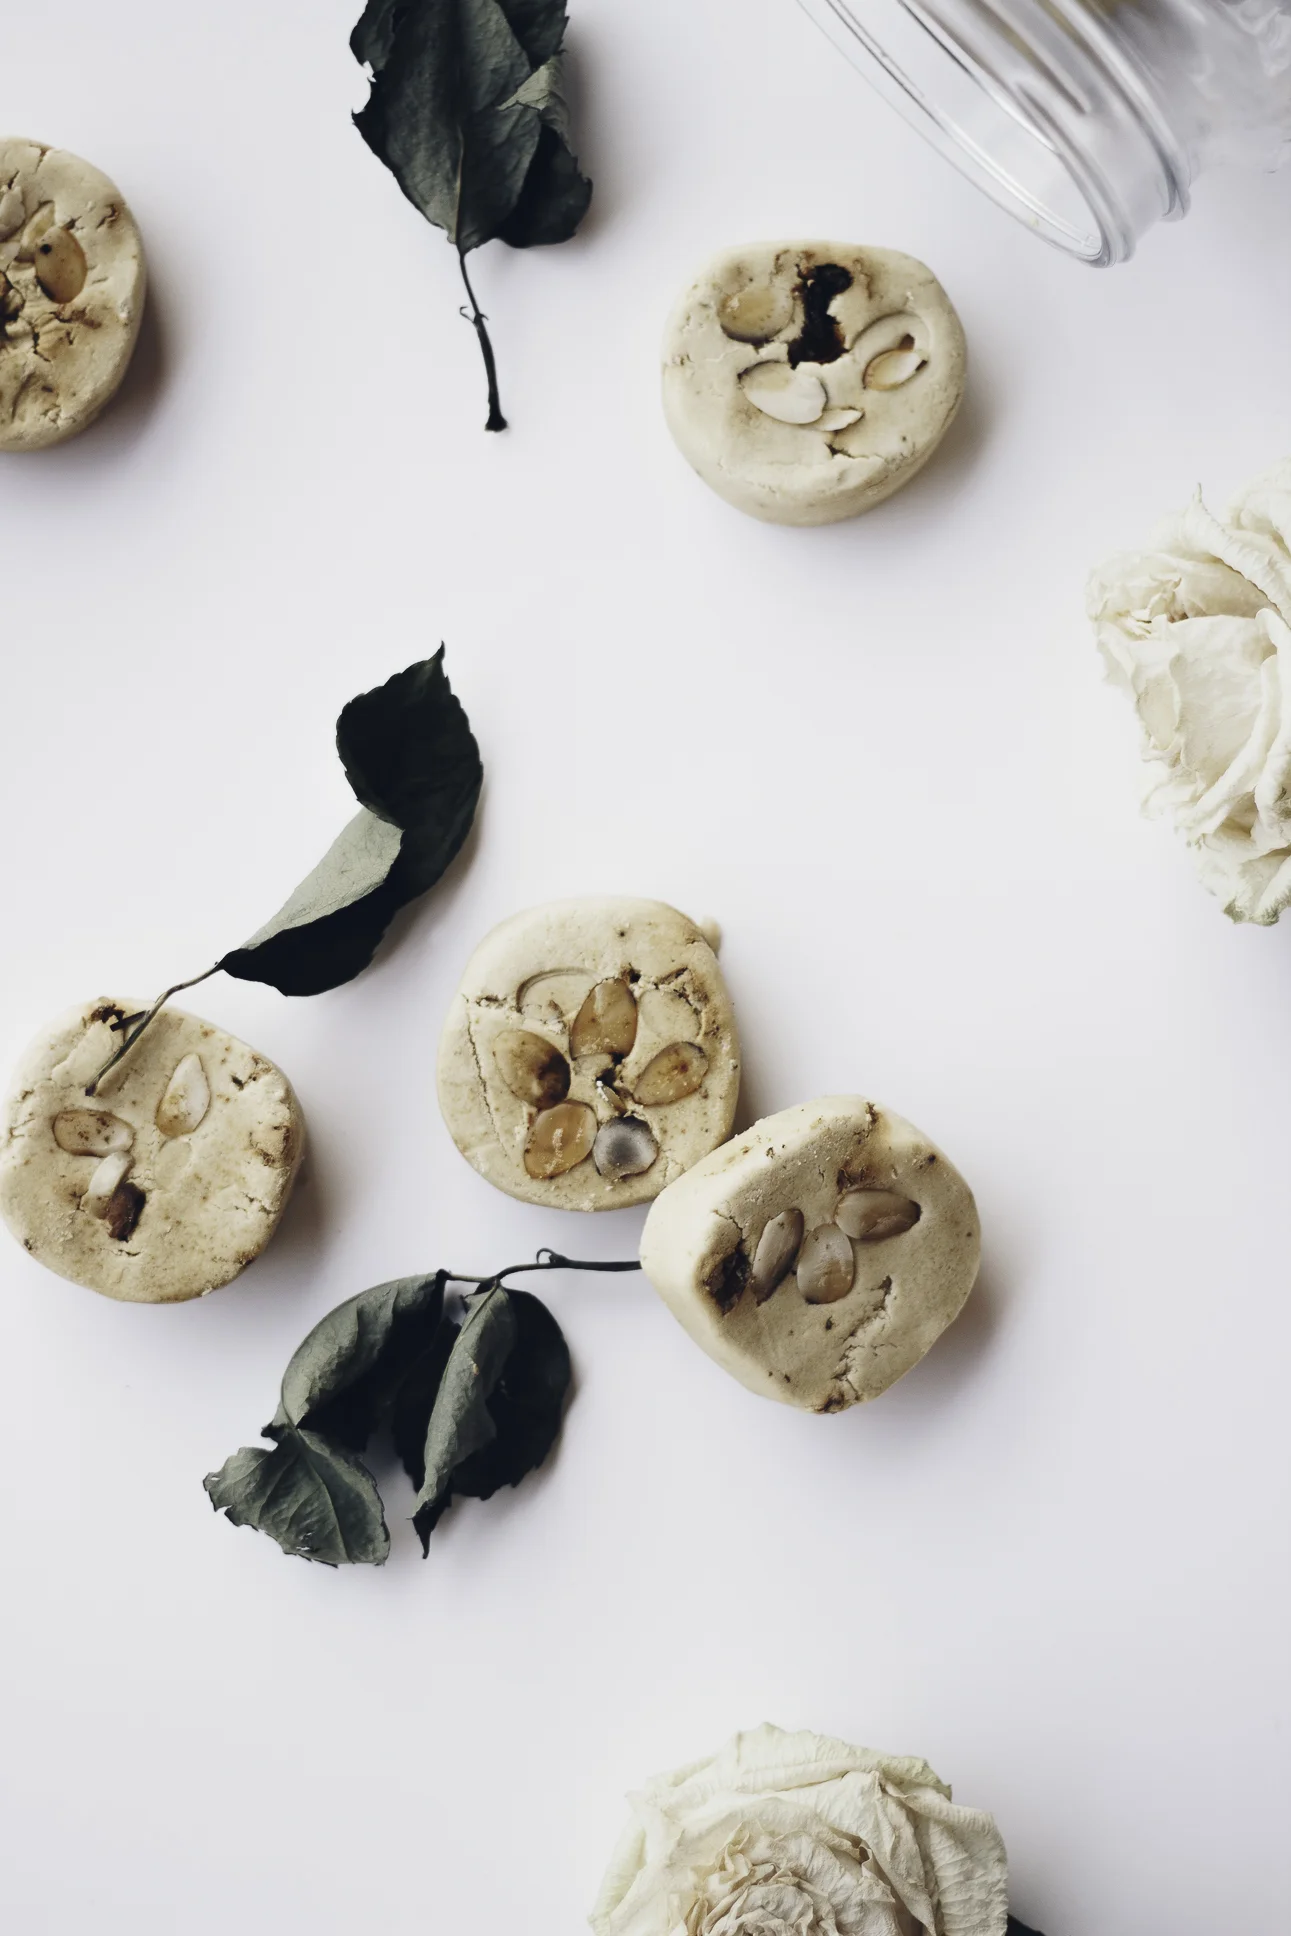
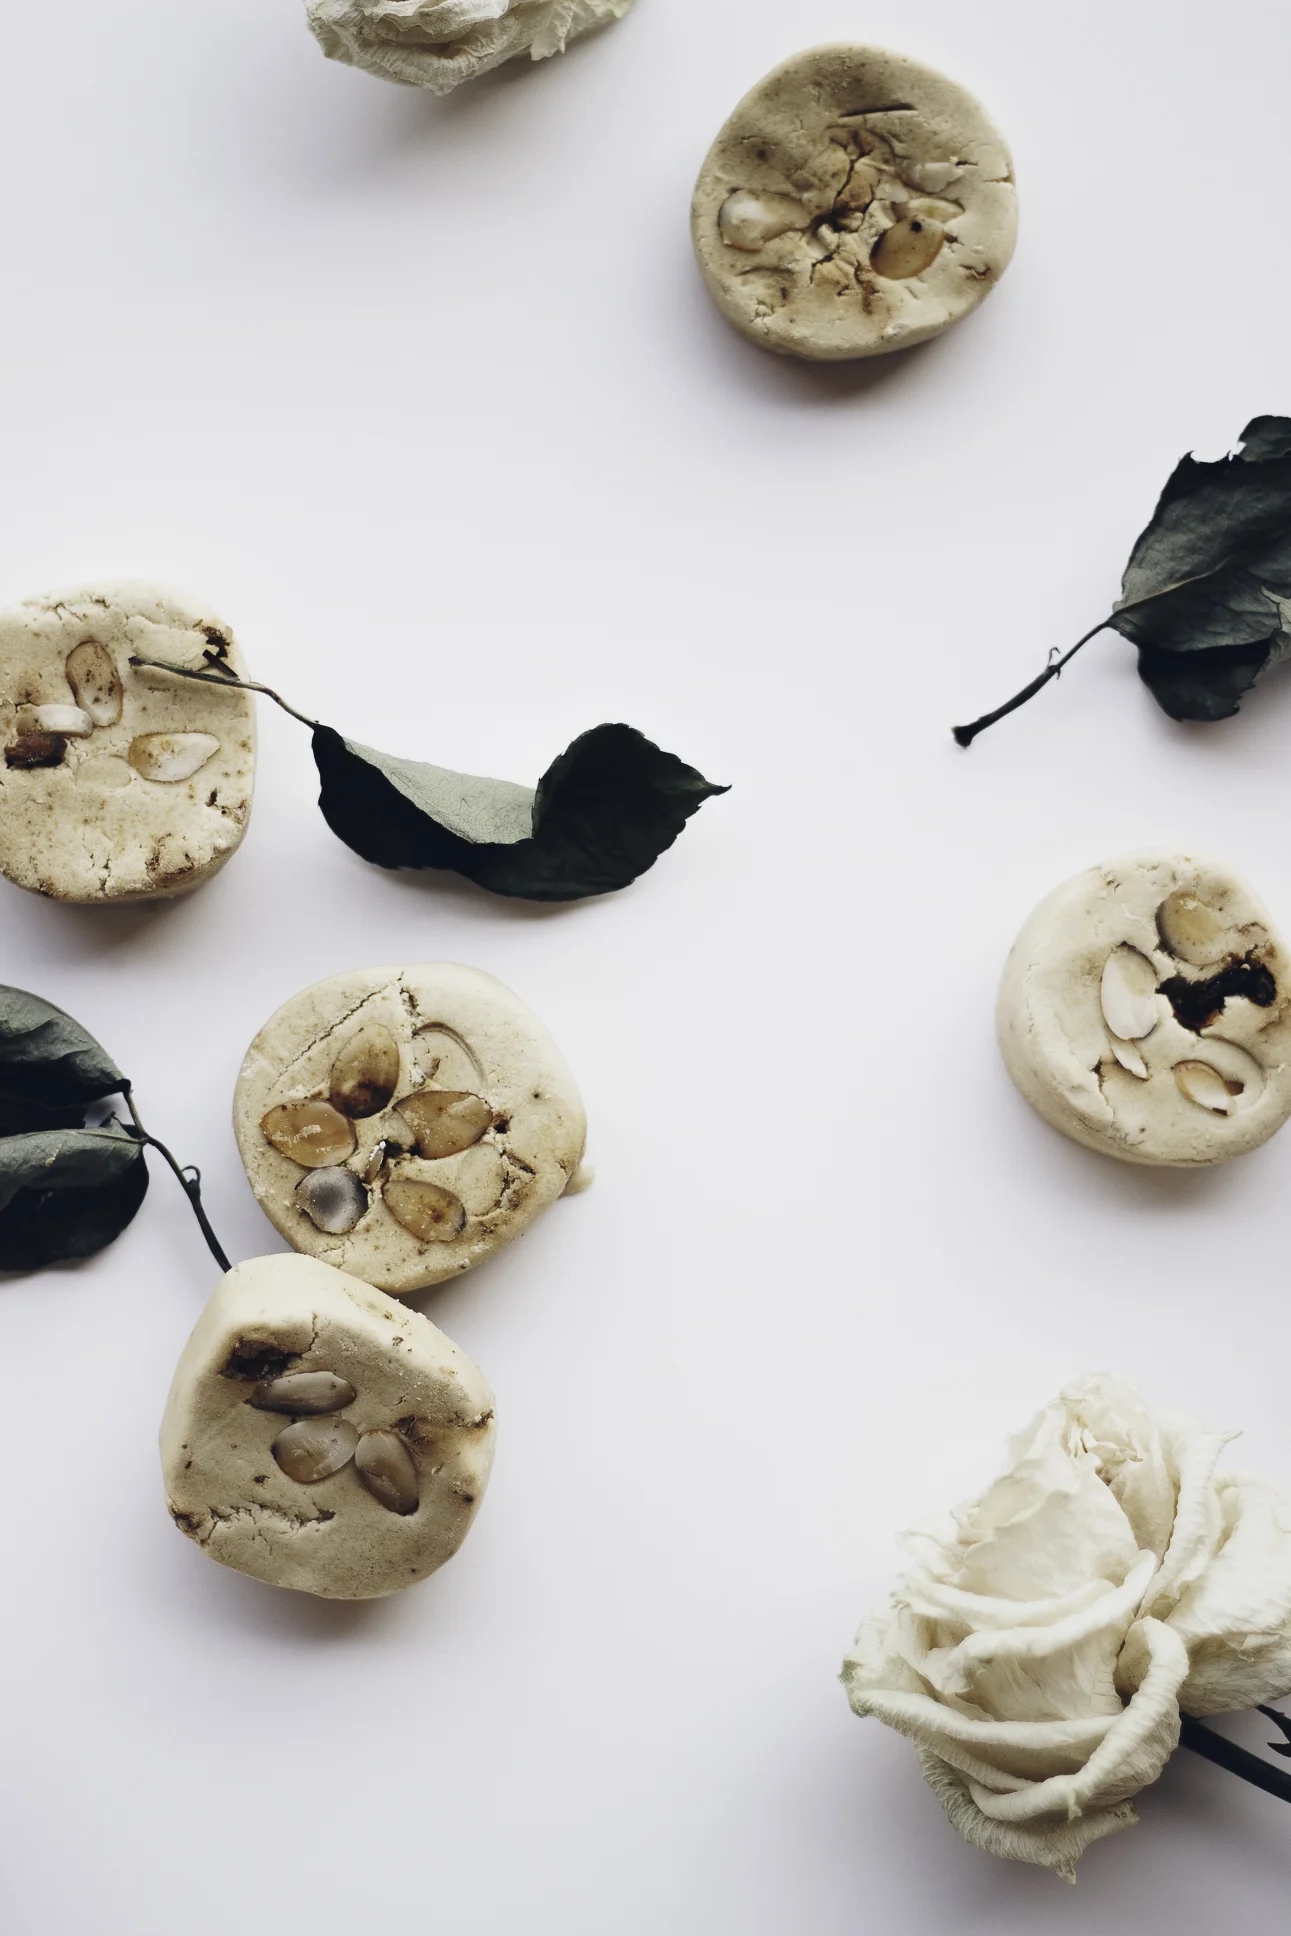
So, let's get into the recipe! I used baking soda and rice flour for their exfoliating properties. Rice flour has an amazing array of skin benefits, which you can read about here. It's one of my favorite ingredients to use. I also used glycerine, which is really good for moisturizing the skin and is very important for these particular areas that are prone to being dry. Castille soap is a natural soap that will cleanse the area without adding buildup to achieve a squeaky clean. Rosehip oil is another amazing ingredient for combatting hyperpigmentation. Then, there's matcha. I added that in just for the fun of it, but it also has anti-aging properties, which is always a good idea! I sprinkled in some rose petals as well, then topped each with some almonds mainly for the pretty-factor, but they both add to that exfoliation.

Like I said, you can get creative with the ingredients you add in as far as oils and herbs. Next time, I think I will be adding in licorice root. You can read up more about licorice root here.  

 
HelloLovelyLiving.com | DIY Exfoliating Body Bars
 
 
HelloLovelyLiving.com | DIY Exfoliating Body Bars


DIY

Exfoliating Body Bars


INGREDIENTS


  • 2.5 cups baking soda

  • 1/3 + 1/2 cups rice flour

  • 1/3 cup glycerine

  • 1/2 cup castille soap

  • 1 Tbsp rosehip oil

  • 4 tsp matcha powder

  • Toppings: rose petals + slivered almonds

Yield: 18-20 3" x 1" rounds


INSTRUCTIONS


In a large bowl, mix all dry ingredients together first - baking soda, rice flour, and matcha powder. Then, in a separate bowl, mix all of the wet ingredients together - glycerine, castille soap, rosehip oil.

Slowly add the wet mixture into the dry mixture, mixing in between until a dough starts to form. You will have to kneed the mixture, which is basically the best part! Once it comes together, sprinkle in rose petals, then roll it out into a 3" log on parchment paper.

Cut into 1" rounds and press slivered almonds onto each piece. Set on parchment paper to dry for 24-48 hours or until completely dry. Place them in a covered container.

To use, simply use on wet skin to exfoliate the area. Apply in circular motions until desired exfoliation is achieved, then rinse off.


Will you be trying this recipe? I'd love to hear about your experience, so do come back and let me know how it works for you!


*I have linked products for your convenience, which may include affiliate links.


DIY Turmeric Skin Lightening Mask

I can not stress how important it is to take care of your skin while you are young! To all of my younger readers out there, you have a leg up on us #oldies. If I could somehow scold my younger self, I would. I so, so would. But, then again, all this plethora of information that is available online wasn't available when I was a teen, so I can't be too harsh on my younger, naive self. Now that I'm in my 30's I'm doing everything I possibly can to educate myself about my skin and to care for it better and smarter.

With that said, I hope you take advantage of this DIY Turmeric Skin Lightening Mask that I've been using lately. I like to switch things up in my skincare routine so that I stay excited. Trust, I get bored of my skincare regimen all. the. time. This is why it's so important for me to experiment with new ingredients and keep things fresh! Enjoy this, pretties!

 
HELLOLOVELYLIVING.COM | DIY Turmeric Skin Lightening Mask
 

Okay, so if you haven't heard about the skincare benefits of rice flour, then first head on over to my previous post on the topic right here. It's one of the skin lightening ingredients I swear by and is in this very recipe.

Let me first clarify, by skin lightening, I am not talking about changing the color of your skin. I am specifically talking about reducing hyperpigmentation caused by acne, scarring, or just in general. Having light skin, I am prone to hyperpigmentation. However, regardless of skin color, we all are prone to hyperpigmentation in some shape or form, which is basically an overproduction of melanin in the skin.

If you suffer from hyperpigmentation, whether that be on your face or other areas of your body - be it your underarms, bikini area, thighs, knees, elbows, neck, etc., natural skin lightening remedies are available to you and are highly effective. 

In my research, I have found so many amazing ingredients that work well for hyperpigmentation. I will briefly touch on the ones that are used in this recipe. 

 
HELLOLOVELYLIVING.COM | DIY Turmeric Skin Lightening Mask | Lemon Benefits
 

x Lemon


Lemon contains citric acid, which is a form of AHA or Alpha Hydroxy Acid making it a highly effective skin bleaching agent. Lemon promotes the turnover of new skin cells and allows the dead skin cells from the surface of the skin to - in essence - melt away. You can imagine how effective this can be for repairing damaged skin. AHAs are well known for their use in cosmetics, so why not just squeeze some natural, unprocessed lemon juice and get the same results without all of the added chemical-junk.    

 
HELLOLOVELYLIVING.COM | DIY Turmeric Skin Lightening Mask | Turmeric Benefits
 

x Turmeric 


Turmeric is one of those ingredients that you can't help but fall in love with. It is SO good - and I mean that. Not only is it good from the inside out, it's good from the outside in. It can be used both in cooking and in topical applications. Why is it so beneficial? To put it simply, turmeric contains individual phytonutrients that have effective skin lightening properties. In particular, turmeric is well-know for its phytonutrient, cucurmin, which is distinguished by its bright, yellow-orange color. Curcumin blocks the formation of free radicals and melanin production and inhibits tyrosinase, which is involved in producing the melanin pigment. It is basically a powerhouse of antioxidants, so your skin is going to drink that stuff up and love it.


HELLOLOVELYLIVING.COM | DIY Turmeric Skin Lightening Mask | Rice Flour Benefits
 

x Rice flour


As I mentioned previously, I did an extensive post on the benefits of rice flour, so head on over to this post! Rice flour is honestly a miracle ingredient and just something you need to be using if you want to instantly reveal a brighter complexion. I'm speaking from experience!


HELLOLOVELYLIVING.COM | DIY Turmeric Skin Lightening Mask | Turmeric Benefits
 

x licorice root


So, a favorite pastime of mine is Googling random herbs + skin and seeing what pops up on the topic. Almost 100% of the time, I will learn some amazing skincare secret that I never knew about. Licorice root was one of those ingredients!

I discovered that when ingested, licorice root powder has the power to lower testosterone and massively inhibit androgen stimulation of the sebaceous glands, with the result being less oily skin and clogged pores. I won't dive into it in detail, but here's a very interesting video on the topic that really opened my eyes about it.  I initially started taking licorice root for its ability to regulate my hormonal acne, then I discovered that it was more beneficial when applied topically.

Licorice root has amazing skin lightening properties due to its ability to also inhibit tyrosinase or melanin formation like turmeric. It is considered to contain some of the most potent skin lightening properties available in a plant. One compound, liquiritin, acts directly on melanin to disperse and remove it. Licorice root also has been shown to protect against UV radiation. Here's a more detailed article about licorice root and it's skin benefits.

 
HELLOLOVELYLIVING.COM | DIY Turmeric Skin Lightening Mask | Ingredients
HELLOLOVELYLIVING.COM | DIY Turmeric Skin Lightening Mask
HELLOLOVELYLIVING.COM | DIY Turmeric Skin Lightening Mask | Ingredients
 

DIY

TURMERIC SKIN LIGHTENING MASK


INGREDIENTS


  • 1 tsp turmeric

  • 1 Tbsp rice flour

  • 3 capsules licorice root powder

  • Juice of half a lemon


INSTRUCTIONS


Mix all ingredients together to form a paste. Apply to the area you want to treat and then let it sit for 15 minutes or until dry. Gently rinse and exfoliate off with a sponge (this is the sponge I use) and warm water. If there is a yellow tint still remaining on your skin, remove with a toner on a cotton pad (I use witch hazel).


Will you be trying this skin lightening mask? I'd love to hear about your experience, so do come back and let me know how it works for you!


DIY Rice Flour Face Mask - The Secret To Brighter Skin

It's a known fact that I am all about plant-based options - and when it comes to skin - I have recently been obsessed with one ingredient that has shown an immediate improvement in the appearance of my skin. 

Yes, honey, rice flour it is. Your initial impulse to natural skincare wouldn't probably be to reach for your trusty rice kernels, but darling, you should be! Rice flour may just as well be the thing you need to be reaching for to get your skin looking brighter, lighter, more even-toned, and smoother.

More about natural skincare: Using olive oil as a natural remedy for greasy faces.

Read on to learn how to make this easy 2-ingredient mask that is utter obsession-worthy!

HelloLovelyLiving.com | DIY Rice Flour Face Mask - The Secret To Brighter Skin
 

Fact: I personally suffer from hyperpigmentation in my chin and mouth area. This is due to problematic skin in that area over the years, not to mention countless years of probing that region whenever I would have a breakout. I mean, it's not that bad, but it could be better!

Can we all agree that it's just so hard to not want to pick at problem areas!? It's the absolute worst. Recently, I've been more conscious about taking care of my skin. I'll attribute that to finally reaching my 30's. If only I had paid more attention to my skin in my 20's. *sigh*

Once I reached my 30's, I started to see noticeable changes in the appearance of my skin that I didn't particularly like. Enter: Fine lines and soon-to-be wrinkles. Milia. Hyperpigmentation. Uneven texture. *balls eyes out*

Mhm, that's the exact process I went through, then I was reminded of a product that I absolutely loved - PLANT Apothecary's Rice & Clean Gentle Facial Cleanser. I absolutely loved it. Gentle, exfoliating, yet it didn't strip my skin of moisture.

So, I had an idea. I have rice flour in my pantry, (#asian) so I thought, why don't I just make a mask out of it! Genius moment. That's exactly what I did - and it was the best experiment ever to take place.


The first time I tried it, my face was lighter and brighter immediately after. No joke!

Here are some interesting facts about rice: Rice flour has been used for centuries in Asia, particularly Japan as a whitening agent for the skin. I won't go into full detail, but rice bran has certain inherent properties such as PABA (para aminobenzonic acid) as well as Ferulic acid and allantoin, which acts as sunscreen/anti-inflammatory agent. Tyrosinase inhibits the production of melanin in the skin, and Vitamin B boosts new cell production and slows down the aging process (yay!). Last but not least on important facts, rice flour brightens the skin by improving collagen production and elasticity. 

I can certainly attest to it having a brightening and lightening effect on my skin. Not only did it happen the first time I tried this face mask, but it happened every single time thereafter. It also acts as an exfoliant upon removal, and my skin looks and feels a lot even-textured immediately afterward. Needless to say, I've been addicted to doing this almost every night. It does exactly what I want it to, and it's the easiest thing to make. So, why wouldn't I get addicted!

If you're looking for a way to naturally lighten your skin without ever touching harmful ingredients, this is for you. I would think that it would also work well on other areas of the body, so it's worth a try. I've seen significant improvement in my skin since I've been using this face mask, which is why I had to share it in hopes that it will help anyone who suffers from hyperpigmentation.

Here's how to make this yummy, delightfully-scented, and completely natural 2-ingredient face mask:

 
HelloLovelyLiving.com | DIY Rice Flour Face Mask - The Secret To Brighter Skin

diy

rice flour face mask


ingredients


  • 1/4 cup sweet rice flour or regular rice flour

  • 1/4 cup water


Instructions


In a small mixing bowl, add the rice flour, then slowly add water and mix until a creamy paste forms. Apply a thin layer to the face with a brush, avoiding the eye area. Leave on for 15-30 minutes until it feels noticeably dry. Using warm water and a washcloth or a natural charcoal sponge* (what I use), gently remove the mask in circular motions. Pat your face dry, then apply your favorite moisturizer to your skin. Cover and save the remaining product in the refrigerator for use throughout the week.

I personally use this mask very often, so it is completely up to you on how frequent you want to use this mask. The more often, the better, as it will work it's wonders over time.

You can find rice flour at most grocery stores. I personally use sweet rice flour found at my local asian store.


Wasn't that just the easiest DIY face mask EVER! Yup, thats why I love it. I seriously hope you try it out because it works! No sugar-coating here. Since I'm that obsessed, I partnered with PLANT Apothecary to give away one of their Rice & Clean Gentle Facial Cleansers that I had mentioned earlier! Click the button below for entry details.


Will you be trying out this recipe? If you do, I'd love to see your photos! Go on, tag me in your photos on Instagram using #hellolovelyliving and @hellolovelyliving so I can get all heart eyes on your photos + share them so others can do the same! 

*affiliate link