Posts in lifestyle
My Healthy + Quick 5-minute Breakfast | Stir Fry Yu Choy & Eggs Recipe

Today, I’m sharing one of my favorite meals to eat for breakfast. It’s healthy and easy to make, and if I could have this for breakfast every day, I would! I typically use kang kung (water spinach) with this recipe, but when it is unavailable, I like to use yu choy. Chinese vegetables are so delicious! I highly recommend you pick some up the next time you are at an asian market.

 
hellolovelyliving
 

If you haven’t had yu choy yet, it has a mild flavor, so it soaks in all the flavors of a dish really well. Typically, I stick to a few main ingredients when I season asian vegetables. The ingredients in this recipe are what I use for literally all of my vegetable dishes. You can use the same ingredients to experiment with other vegetables as well.

Now, let’s get into the recipe! Watch the full video below first, then refer to the specific measurements and ingredients within this article. Happy cooking!


Stir Fry Yu Choy & Eggs


Servings: 1 serving
Prep: 5 mins
Cook: 5 mins
Total time: 10 mins

Ingredients

  • 6 stalks yu choy
  • 2 eggs
  • 3 garlic cloves, minced
  • 2 stalks green onion
  • 2 Tbsp yellow onions
  • 2 Tbsp fried shallots
  • 1 tsp chicken bouillon
  • 2 Tbsp butter
  • 2 Tbsp water
  • garlic powder
  • black pepper

Instructions

  1. Heat wok or skillet on high. Add 1 Tbsp butter to pan, and add garlic, onions, and green onions. Saute for a minute until transparent and slightly golden on the edges.
  2. Add vegetables and water, then stir fry for several minutes. Add garlic powder, black pepper, and fried shallots. Stir fry until vegetables are a bright green and slightly cooked through until crisp, but not overcooked. Remove from heat, and set aside.
  3. With the same pan, add 1 Tbsp butter and pour in scrambled eggs. Lightly move eggs around until cooked through, but not overcooked.
  4. Assemble plate with vegetables and eggs, and enjoy!

Notes

  • Substitute yu choy with other vegetables such as kang kung (water spinach), bok choy, or other vegetables of choice.
 
hellolovelyliving.com | My Healthy + Quick 5-minute Breakfast | Stir Fry Yu Choy & Eggs Recipe
 

What is your go-to healthy breakfast?


Traveling Is Good For Mind, Body, And Soul

We’re two weeks into 2019, and I’m making it a point to explore a lot more of California and hopefully travel out of state a few times this year. I love to travel, and I am already getting antsy from keeping still for too long, and I’ve only been in California for a year. I believe traveling and getting beyond your comfort zone is so important for growth and in realizing that there is so much more beyond us and outside our little box that we create for ourselves sometimes.

Over the weekend, we took a drive to Oceanside, which is around an hour from where I live. You don’t need to hop on a plane to travel - just hop in your car! I was absolutely blown away by the colors of the sunset and the water when I arrived. I did not want to leave! I’ll be sharing a few photos from that day and a brief writeup from one of my Hello Lovely Living contributors about why traveling is so good for you.

 
hellolovelyliving
hellolovelyliving
 

Have you booked your next vacation yet? You should, as traveling is good for your mind, body, and soul. If you know you are long overdue for a holiday, let this article offer you the incentives you need to book your next flight and escape into your nearest getaway. You might then reach new levels in your life, giving you a sense of renewal in a holistic and meaningful way.


Traveling is good for the mind


You probably don't need us to tell you this, but for your mental wellbeing, traveling is a must. It will sharpen your mind, and you will be forced to think on your feet, such as when you're trying to navigate new places or make sense of foreign languages.

According to this article, traveling is also a number one mood booster because getting away from it all is an effective way to alleviate the symptoms of stress and depression.

You will also increase in knowledge since while traveling, you will get to experience new cultures, tastes, sights, and sounds, each of which will grow your mind and your perspectives on life.

 
hellolovelyliving.com | Traveling Is Good For Mind, Body, And Soul | Oceanside Pier, California
 

Traveling is good for the body


This depends on you, of course. If you spend all of your vacation time sunbathing on the beach and eating and drinking anything that is an escape from your usually carefully-prescribed diet, then you are doing your body a disservice.

On the other hand, if you explore your surroundings by hiking on foot or by using a bicycle, spend some of your days swimming in the sea or in the pool, and make use of the exercise facilities at the hotel, then you are going to do your body a lot of good.

That mixed with the health benefits of the sun in more tropical climates and the courage to try some of the more healthier cuisines will ensure your body feels the benefits while away.

 
hellolovelyliving.com | Traveling Is Good For Mind, Body, And Soul | Oceanside Pier, California
 

Traveling is good for the soul


We aren't necessarily talking about the religious benefits of traveling, although many people do find the ability to connect with their faith when away. Rather, we are suggesting that traveling is a good way to help you connect with yourself.

This is your opportunity to get away from it all, so while you might still keep in touch with friends and family back home through phone or this physical address service, you might also want to remove yourself from the chaos and people of your life by finding time to be alone.

It's while you are away that you will be able to gain a new perspective on your life and on who you are as a person. You might spend time meditating on mountain tops or on a secluded part of a tropical beach to ponder life's bigger questions.

You will have the opportunity to think without your usual distractions getting in the way. As you learn new things about yourself, and as you get a better sense of reality away from life's worries, you should return home with a renewed soul and vigor for life.

 
hellolovelyliving.com | Traveling Is Good For Mind, Body, And Soul | Oceanside Pier, California
 

So, what are you waiting for? For both body, mind and soul, getting away from it all could be the best thing you do this year. Book a flight away, and renew every aspect of your life. It could be just what you need to do to feel complete again.

If you are looking for a place to stay while traveling, I highly recommend Airbnb. You can find really affordable and convenient places to stay within the area you want to explore while still feeling at home. Get $40 off your first Airbnb trip with the link below!


HELLO LOVELY LIVING

discount codes


hellolovelyliving.com | Traveling Is Good For Mind, Body, And Soul | Oceanside Pier, California
 

where are you wanting to travel to this year?


This post contains referral links. Please see my privacy policy for a complete disclosure.


DIY Urban Outfitters Hanging Wood Shelves | Daiso Hack!

Today, I’ll be showing you how to make these oh-so-cute hanging wood shelves. The idea came to me after coming across wooden cutting boards at Daiso. If you’re not familiar with Daiso, it’s a popular discount store that sells Japanese products for $1.50 and up, so you can find many things for the home there for very cheap. Daiso is everywhere here in California, so I am living for it!


I purchased the wood cutting boards not knowing for sure what I was going to make with them until I remembered this Urban Outfitters hanging shelf that I had bookmarked a while back. I realized that the wood pieces from Daiso would be perfect for creating a product dupe for much less. In all actuality, these DIY hanging wood shelves probably cost less than $5 each to make, and being that I already had everything I needed to make these except for the wood, it only cost me $3 for two - what a steal!

 
hellolovelyliving
 

I love how they turned out (I made two of them), so I hope you try making them too. This is one of the easiest wood shelving ideas, especially if you live in one of these apartments for rent in McKinney and you want floating wood shelves, but you are looking for more of a quick and easy way to do it. I absolutely love the raw and natural wood look of these too, so these came out perfect and fit my aesthetic and decor so well. They also have that minimalist + bohemian + Tumblr vibe going on, and we are all about that life over here!

Watch the video below to learn how to make it, and if you are needing a to refer back to the instructions, I have written them out below. I have also listed all of the supplies needed for this project. Enjoy!


Supplies


2" Natural wood rings

Off-white yarn

• Daiso wood cutting board 30 x 19 x 0.9 cm (11.81 x7.48 x 0.35")

• IKEA Drill

• Scissors

• Pen

Wall hooks


instructions


STEP 1

mark holes + drill

At each corner, mark 1” in from each side, then drill a total of 4 holes.


STEP 2

cut yarn + string through holes

Cut 2 - 4’ pieces of yarn and then string each piece along the landscape orientation of the wood. Evenly distribute yarn so that when it is held upright, you have even lengths of yarn at both sides.


STEP 3

loop strings through wood ring + adjust placement

Gather strings through the wood ring and then place the shelf up against a wall to test out the placement of the strings. To ensure that the wood piece hangs level to the wall, adjust the string’s tension by allowing the wood piece to even out so that it is laying flat. Your strings will be angled slightly, so just hold them tightly against the wood ring because a knot will be placed around them at this length.


STEP 4

cut a 12” piece of yarn + make a gathering knot

Watch my YouTube video above for how to do this part because this is the tricky part!


STEP 5

hang + enjoy

Hang your shelf anywhere on your walls with a picture hanger hook which provides a bit of an angle for the wood ring to rest in. These are the exact ones I used to hang mine.

 
hellolovelyliving.com | DIY Urban Outfitters Hanging Wood Shelves | Daiso Hack!
 

Wasn’t that so simple?! I thought it was a very easy project to do. Two shelves could very well be done in less than 15 minutes, so it is also a very quick project. If you decide to make these, let me know how yours turn out. I’d also love to see how you style these.


what home decor items have you been eyeing lately?


This post contains affiliate links. Please see my privacy policy for a complete disclosure.


Kid-Friendly Things To Do in Palm Springs - Follow Us To Palm Springs!

This post is sponsored by Palm Springs but the content and opinions expressed here are my own.

Uriah and I took a day trip to Palm Springs over the weekend, and I wanted to share what we did, so in this post I will be doing just that. If you are in the SoCal area, Palm Springs is a great destination for a quick getaway. I wanted to plan my trip so that it was kid-friendly since it was Uriah and I on this trip, so I have compiled a few places that you can consider if you have children too. The Palm Springs Home Page was a great resource for me to start when planning my itinerary for the day.

 
hellolovelyliving
 

On the way to Palm Springs, the perfect pit stop is less than 30 minutes out from Downtown Palm Springs if you are heading east from Orange County. Cabazon Dinosaurs is an iconic pop culture attraction located just outside of Palm Springs and was featured in Pee Wee Herman’s Big Adventure and The Wizard. Mr. Rex’s Dinosaur Adventure includes a dinosaur exhibit featuring over 50 lifelike dinosaurs, a dinosaur dig, fossil panning, and access to climb inside Mr. Rex all the way up to his mouth.


Uriah absolutely loved it there, even if we didn’t get to go into the exhibit. It’s a nice stop and we simply enjoyed the large dinosaur statues that were outdoors and the dinosaur-themed shop that was located inside one of the dinosaurs. This is a must-go for snapping some photos of some unforgettable memories.

 
hellolovelyliving.com | Kid-Friendly Things To Do in Palm Springs
 

That was our first stop, and then we were headed straight to Downtown Palm Springs. On our way, we could see the vast amount of windmills sprawled across the desert, which is also a popular attraction that is worth the view along with the beautiful mountainous landscape.

Once we got to Palm Springs, we were welcomed by beautiful palm trees and a drive through the main downtown strip that is lined with an abundance of shops and restaurants. Instead of exploring the usual attractions, I chose Frank In Bun as our lunch spot since I knew they had kid-friendly food options such as fries, corn dogs, etc., and of course, their interior was Instagram-worthy and very charming, which was a must! It’s great to go off and explore places that are a little hidden and off the beaten path, so that is what I chose to do.

 
hellolovelyliving.com | Kid-Friendly Things To Do in Palm Springs
 

Once we were all finished with lunch, we headed back to the downtown area which was just a couple mins away, and I parked a few blocks out so that I had effortless parking and could just walk a few short minutes. On our walk, we came across a beautiful mural of Marilyn Manroe and we could see Palm Spring’s version of The Walk of Stars along the sidewalks. There is a lively arts district in Palm Springs, and you can find many art museums and shops in the area, so be sure to explore.


We then headed to a small boho shop called Thick As Thieves. It is located along Downtown South, which is at the very end of the Downtown strip, so it was less busy, and I loved that. The shop was quite small, but had miscellaneous and cute bohemian-themed home accessories and decor.

 
hellolovelyliving.com | Kid-Friendly Things To Do in Palm Springs
 

Along the side of the shop, there was a cute alleyway with additional shops, which happened to be my favorite spot from the trip because there were perfect little photo backdrops that I just loved. It had a very cottage-like feel, and it was a cute area that Uriah enjoyed exploring and running through. I also took a lot of cute shots of him there.


We then crossed the street, and in a few minutes, we were at Rudy’s General Store Museum, a recreated 1930’s shop filled with old fashioned, unused products. It was pretty interesting to see how many authentic products they had that were in such great condition. None of it was on sale, though - bummer! I also thought it would be fun for Uriah, but he didn’t really get the concept yet haha, so we didn’t stay too long, plus it was a very small shop, so look to spending only a few minutes there browsing through. They also charge a $1 admission, but that is not too bad at all!

After that, we stopped by at a candy shop just located right outside of the museum called Palm Springs Fudge & Chocolates. They have various sweet options as well as Dippin’ Dots. Uriah just got bought a ring pop, then we headed back to the car because we only had an hour before the sun would be going down.

 
hellolovelyliving.com | Kid-Friendly Things To Do in Palm Springs
 

I decided to find an outdoor park/playground for Uriah to get his energy out at and have some fun since much of the attractions were geared toward indoor activities. I found a playground called Demuth Park, which had really great reviews and looked like a fun spot for him with huge slides. It was only about 10 minutes away. So, we headed there, and he had such a great time.

 
hellolovelyliving.com | Kid-Friendly Things To Do in Palm Springs
 

Before the sun went down, I decided to find “That Pink Door”. If you are an avid Instagram-addict like myself, you would have seen and heard about this popular Palm Springs Instagram-photo-op destination. Since it is private property, I simply drove past and didn’t stop to take photos, but happy nonetheless to see it in person. The homeowners have since announced that they do not want anyone to take photos there anymore, so I respected their wishes! Watch my vlog for all the footage though of me driving through and getting excited to see it in the wild.

So, that was it and the end of our trip! The sun had gone down, so I headed back home which was a 2-hour drive. I enjoyed our quick little mini getaway! Exploring a different environment and soaking in the different scenery is always my favorite thing to do to reset and recharge. There is a lot more to do in Palm Springs that I would have loved to do, so I will list just a few other things that may be of interest to you if you are planning a trip there soon! Another great resource that I highly recommend is the Palm Springs Home Page, so make sure to check them out for ideas of what to do in the area.


Links to Places Mentioned


other kid-friendly things to do


save money


HELLO LOVELY LIVING

discount codes


I hope you enjoyed this little travel inspiration post! I encourage you to get out there and explore your area! There is so much to see and do, and you don’t need to go out of state or spend a ton of money to experience different things, sceneries, and environments. Be sure to also watch our vlog from this trip for some extra footage of Palm Springs on my YouTube channel or click the video below.


have you been to palm springs? what is your favorite spot?


Get Real Money | Money Making Apps That Really Work: Ibotta

I love to save and earn money whenever and wherever I can, so today I am starting a series in which I feature ways to do just that! As a business owner and single mom, I am always looking for every opportunity to make my money go even further. Every single thing adds up, and if you are going to spend money anyways, why not save a few bucks? These days, there is always a deal and there are always ways to save - you just have to be resourceful and not impulsive when it comes to purchases. I look forward to sharing more of my money-saving and money-making tips in this series, so I hope you enjoy it and find it to be helpful!

 
hellolovelyliving
 

ibotta


Ibotta is a cash back app that allows you to transfer 100% of your Ibotta earnings to PayPal or Venmo as soon as you've earned $20. If you'd rather convert your earnings into a gift card, you can do that, too. You can earn money on purchases from 289 retailers like Target, Walmart, Sprouts, and Amazon (to name a few) and have 3 ways to earn, so it’s easy to rack up those earnings quickly!


how it works


Step 1

Sign up + add offers

SIgn up here. You’ll receive a $5 bonus just for signing up! Simply search for offers and add them by completing simple tasks like answering a question or watching a short video.


Step 2

go shopping: three ways to earn + bonuses

Earn money in 3 ways: Send receipt, link a loyalty card, or make mobile in-app purchases. Depending on which way(s) you choose to earn, you will required to follow the steps in order to redeem your purchases. You can also earn cash from bonuses.

Send Receipt

Buy the products at participating stores. Redeem offers by taking a photo of your receipt and Ibotta will match your purchases with the offers you selected.

Link Loyalty Card

Link your store loyalty account by choosing one of Ibotta’s Preferred Partners. Use your loyalty card or phone number at check out.

Mobile In-app Purchases

Before you shop, browse cash back offers from top apps. Tap on the Shop button from the Ibotta app. Make a qualifying purchase in a participating app.

Bonuses

Get extra cash back by completing bonuses such as redeeming offers at specific retailers and by completing certain tasks.

Referral + teamwork

When you invite friends to download the app, Ibotta gives you a cash gift for doing so. Friends can also become a part of your team if you sign up using Facebook and everyone can take advantage of teamwork bonuses offered every month.


Step 3 get cash

Your cash back will be deposited into your Ibotta account within 48 hours of submitting offers. You can then cash out your earnings to PayPal or Venmo once you’ve earned $20.


Get Real Money! Money Making Apps That Really Work https://bit.ly/hllxibotta @hlovelyliving #hellolovelyliving


Final Thoughts


Why I like Ibotta

Ibotta is an easy way to save money on ordinary purchases, and offers are so easy to redeem. Cash back can really add up quickly. I have earned over $50 using Ibotta so far, so I highly recommend it from my personal experience.


PRO TIP

To save even more on my purchases, I also like to search for matching offers on other coupon apps like the Target app. Many times, offers will be available on both the Target and Ibotta apps, which means that you can save even more on products and potentially get products for free or next to nothing. If you are an extreme couponer, you could even find matching coupons that you can redeem at the store in addition to using Ibotta and other digital coupon apps.


Of course, there’s always the option of benefitting from coupons, promo codes, and credit offers from shopping online. So, if you are wanting to make an online purchase at say, Walmart, you can still save money, but instead of having to submit receipts, your purchases would be automatically tracked. It’s a win-win situation either way!

 
hellolovelyliving


That is it for today’s post! I hope you do take advantage of using Ibotta because it is such a simple and easy way to save and earn money, and it would be a tragedy not to haha! Make sure to follow along for more posts just like this in the near future. I am happy to share more of my money making hacks really soon!


do you use cash back apps? which ones are your favorite? 


This post contains referral links. Please see my privacy policy for a complete disclosure.


The Never-Ending Weekend

I am a firm believer in gaining freedom over your life. Society has the ability to pressure us into believing that there is a certain way to do things, and to ultimately live. In this short post, I want to inspire you to get out of your routine and set your weekends on your own terms.

 
hellolovelyliving.com | The Never-Ending Weekend
 

I remember when I was working over 120 hours every two weeks at my full-time day job. I was so exhausted. It took a huge toll on me mentally and physically. I literally did not have any time for myself. A part of me was screaming inside, wanting to end the cycle and regain control over my life. 

This is why, today, I feel so passionately about spreading the message of living life on your own terms and creating the life you want and pursuing work that you love. It's not even about the money for me because freedom, to me, is priceless.

No one has the luxury to change things overnight, which is why I always encourage people to start out small. What if I told you that the first thing you had to do was change your mentality? Well, if there were one piece of advice that would lead you on that path toward independence, that is exactly the first thing I would tell you. It sounds simple, but it simply isn't.

Changing your mentality is something that could take years to accomplish, so let's start out small. Let's carve out days during the week where you feel like you are rebelling against the "norm". Instead of waiting until the weekend to do things that you love to do, why not try to incorporate those activities into your weekly schedule?

I am going to be sharing three ways of how I create a never-ending weekend in my daily life or how I carry my weekend into the work week. What may seem a joyous activity to me, may not be the same for you, so I would like you to start thinking about what makes you happy and use this as inspiration.


How

I create my never-ending weekend


hellolovelyliving.com | The Never-Ending Weekend
 
hellolovelyliving.com | The Never-Ending Weekend
 

Working at my passion

Believe it or not, I love working on the weekends, which is why I put less pressure on myself during the week and just see every day as an opportunity to pursue what makes me happy. A lot of us wait until the weekends to do what we love, which is why I believe we should be carrying that into the week. Don't wait until the weekend to pursue your side-hustle or something that you're curious about pursuing or learning about. Get at it during the week, even if you have to stay up late or set aside a few hours toward it. It will all add up, so don't think that your efforts are too small to see any results.


hellolovelyliving.com | The Never-Ending Weekend
 

Doing spontaneous activities

If you follow me anywhere on social media, you'll know that the beach is one of my most favorite places to be. With that being said, I actually like to go to the beach during the week because it is a lot less busy, and I feel like I am taking a mini-vacation. When you do things that you would ordinarily reserve for the weekend, It feels so freeing and liberating, kinda like when you wear a bra that feels like it's not even there, am I right?! It makes me feel so grateful for the life that I live despite the challenges I face and makes me appreciate the day so much more, which fuels me to continue on this path. I also love to explore Los Angeles or Orange County whenever I feel like I'm craving a new experience. Not only does it expose me to different things that I wouldn't normally have done, it inspires me to keep creating even more new experiences.

 
hellolovelyliving.com | The Never-Ending Weekend
 

Enjoying my favorite foods and drinks

I don't know about you, but food and drinks can make me so happy and get me excited about my day. I take special care to think about what it is that I could eat or drink that would make me happy. Instead of having pancakes only on the weekends, I literally will have it every day if that's what I feel would make me happy. I can be a little extreme when it comes to food, so if I feel like eating something, in particular, I don't care how long it will take me to make it; I make it! It feels so great to listen to your body and feed it what it wants no matter what day of the week it is. 

 
hellolovelyliving.com | The Never-Ending Weekend


So, ladies and gents, that is my never-ending weekend. I know, I'm a rebel. Nothing new to see here haha. I mix work with play, do spontaneous activities, and eat whatever I want! Sounds like a good plan, 'ey? I hope you enjoyed this! I am all for supporting companies that share the same philosophy as me such as helping women feel empowered. True & Co. strives to create products that empower women to embrace comfort and luxury every day of the week.


What does your never-ending weekend look like? 


A special thank you to True&Co for partnering with me on this post. Be sure to check them out for more ways to mix comfort + luxury into your life!  

This post may contain affiliate links. Please see my privacy policy for a complete disclosure.


How to Create Free Online Event Flyers & Invitations in Less Than 5 Minutes
 

Today, I’ll be sharing the fastest, most cost-effective and efficient way to send out flyers and invitations via text, email, or social media. I just discovered this new, free feature, and I’m sharing it in case you’re also needing to send invitations and get responses on the fly! I was able to put together a virtual giveaway party in less than five minutes! I’m just going to jump into how I did it.

 
hellolovelyliving.com | How To Create Free Online Event Flyers & Invitations In Less Than 5 Minutes
 

What you will need to do first is head on over to Paperless Post. Their Flyer feature allows you to create flyers that you can send out digitally - for free! Not only that, but their templates are beautiful, easy to customize, and you’ll be able to manage all of your RSVPs on your account. Simply sign up for an account and all of the free features will be available to you. 

After I customized my flyer on the site, I simply copied and pasted the share url into my email template through Mailchimp and sent it off to all of my email subscribers. You may have gotten that email if you are on my email list! 

I made a short video showing you exactly how to create one of your own, and you'll also get to see how my flyer turned out.


Now, wasn't that the easiest thing EVER! I am so excited about this. It saved me so much time, and come to think of it, this could be used for any type of event - both business or personal. Below is how my flyer looked on screen, minus the gif feature. You can also view it live, here.


hellolovelyliving.com | How To Create Free Online Event Flyers & Invitations In Less Than 5 Minutes


Speaking of which, I have a winner to announce! The winner of my first-ever giveaway party is Taylor!! I will be contacting you via email. Congratulations on winning a branding package, which includes a custom logo and brand style board. Super excited for you, and I can't wait to chat with you. Everyone else who RSVP'd will be receiving an email from me with a special package rate, so look out for that! 

what do you think about Paperless Post's new feature?


A special thank you to Paperless Post for partnering with me on this post. Be sure to check them out for even more paperless options!

This post may contain affiliate links. Please see my privacy policy for a complete disclosure.


New Digital Print - Eat, Pray, Buy Plants + How To Print & Frame With Minted
Hello Lovely Living | Eat Pray Buy Plants Digital Print
 

Hey there pretty, new print! If you haven't noticed, plants are life! On my recent trip to Dallas, I had a chance to visit Ruibal's Plants of Texas, and let me tell you, a girl went wild in there. I saw so many plants that I've been dying to own.

Although I could've easily walked away with 20 plants, I was so sad to walk away with zero of them. I had to restrain myself because I'm on a plant-buying freeze.

For one, I have too many right now, and secondly, I am moving soon, so I wouldn't want to put them through any undue stress. Super-pout status, but you know a girl's going to go all out once it's all said and done. There's no holding me back! In the meantime, I'll be staring at this new print because it is giving me life right now.

In this post, I wanted to quickly share a really simple and easy printing and framing option that I swear by - Minted. If you haven't heard of Minted yet, girrrrl, let me fill you in. It's the number one online marketplace for independent artists, and they sell everything from fine art prints to wedding invitations and home decor. They have it ALL.

Here's the step by step process for printing custom prints with Minted.


How To

Print & frame Hello Lovely digital Prints with Minted


Step 1


Select your digital print. Add to cart. Your digital file will be available for instant download upon purchase. Save file.


Step 2


Go to the Minted website. 


lifestyleStina X


Summer Summer Summertime … Is Over

I'm back with a new post! It's only been a couple months, but hey, life happens, right! Did you miss me? I've been going through a bunch of huge changes in my life all at once, so it's a little chaotic over here, but I can't wait to tell you all about it in the near future! This summer will go down in the books as one of the most memorable summers of all time. I'll fill you in on all of the details later! 

In the meantime, I'm doing something a bit different and sharing some of my summer looks that I have been enjoying and currently transitioning into fall. It's already officially fall, but you know what, it was 96 degrees today in Oklahoma. I mean! Well, that's Oklahoma for ya, so there's that! Can we all agree that summer just can't end!!! It just can't. *bawls eyes out* Anywho (I've used this word since I was in grade school and it has never left me haha), I hope you enjoy this little photo montage. 

First and foremost, I want to give a special thanks to Tobi for collaborating with me on this post and for sending me such cute pieces that I personally picked out and have been obsessing over since. Last but not least, a shoutout to Ekin from Enn Photography who did a lovely job at capturing me in these looks in Oklahoma City.

 
HelloLovelyLiving.com | Shop Tobi
 

JANICE MEDIUM WASH LOW RISE DISTRESSED SHORT DENIM SKIRT | Tobi

Olive Utility Jacket | H&M (out of season)

 
HelloLovelyLiving.com | Shop Tobi
 

Backstory: I've literally passed this dreamy white building with the prettiest flower bush and rustic door a million times and have been wanting to shoot something here. Well, my dreams were realized - FINALLY - and I am so so happy! I will die a happy soul. The end. Haha.


HelloLovelyLiving.com | Shop Tobi
 
 
HelloLovelyLiving.com | Shop Tobi
 

Backstory: I am obsessed with wood textures. Anything wood! Hence, the wood background and concrete accents. If you can tell me which spot this is in Oklahoma City, I will personally shout you out on Instagram. Not that you'd want that or care, but you're welcome. Haha.


HelloLovelyLiving.com | Shop Tobi
 
 
HelloLovelyLiving.com | Shop Tobi
 

Backstory: Here's another spot that I've always been obsessed with. Not only that it's the side of a Whole Foods building, which makes it even cooler, but I'm crazy about grass and vines, so this is a big deal, guys. Huge deal! Okay, I'll stop with being weird now. Haha.


Can you really ever get enough of ripped or distressed denim? I think not. At least, I can't! Definitely check out the Tobi pieces that I linked because most are currently on sale! I hope you enjoyed this short and sweet post. I am very much looking forward to writing more blog posts in the near future (once life slows down a little bit). If you want to catch me on a more frequent basis, follow me on Instagram, and we'll make that happen!


Spring is here - Experiencing The Fullness of Every Moment + Jord giveaway
HelloLovelyLiving.com | Jord Wood Watches | Stina is wearing Fieldcrest in Maple
 

Life is just a bunch of moments packed all into one. At least, that's how I like to see it. At the end of the day, it's all about those tiny moments and being fully present in them to allow us to feel every emotion that they bring us. Now, I know that's not always easy to do, so I wanted to share one way that has helped me soak up each moment more fully. As the seasons come and go, it's easy to want to rush time and jump into the next season right away. Being conscious of this and learning to be more present in the current season is so important.

So, what is it? What do I do to experience the fulness of every moment? Observe. That's it. Think of yourself as an onlooker, experiencing each moment from the outside looking in. Quiet yourself, and let your senses soak up the experience, taking note of how you feel at that very moment. Learning to fully experience how each moment made you feel is so much more powerful and memorable. Once you begin to do this more often, you'll feel gratitude for every moment, and you'll also experience life in a deeper way.

Trust me, you will look at things so much more different if you are intentional in your observations. Ask yourself, how do I feel right now? What do I want to remember about this moment? I have found that what makes life so beautiful is being able to stop and being able to fully embrace how I feel in the moment. For example, when my kids bring me joy, I really do stop and try to feel every single piece of joy that that moment brings me. I know it won't last forever, so I want to enjoy it, fully.

 
HelloLovelyLiving.com | Jord Wood Watches | Stina is wearing Fieldcrest in Maple
 

While we're talking about experiencing the fulness of every moment, I wanted to  share a brand that I am personally loving and whose philosophy ties in with what I touched on above. I'm all about supporting companies who are not just selling a product, but who really care about the experience and how their product makes me feel.

If you know me, you know I love nature. You also probably know that I am crazy about being out in nature, and, well, taking a zillion + 1 photos in nature. If I could take a piece of nature around with me at all times, I so would. No second-thoughts about it. To my very amazement, JORD Wood Watches came into my life and made that a reality.

Let me begin by saying, I am a tough sell when it comes to watches. Reason being, I don't normally wear watches, and I don't necessarily care for watches. The last watch I wore held sentimental value to me because it was a gift from my mom. After it broke, I never replaced it. Translation: I keep and wear things that hold sentimental value to me, and I will not replace it unless it breaks, and even then, I don't go looking to replace it right away. So, owning a watch again was a huge deal for me.


Jord

Wood Watches

WEBSITE | INSTAGRAM | FACEBOOK | TWITTER


The thing that sold me on a JORD timepiece was the idea of combining something modern with something organic and timeless. After all, watches should be just that - a piece that will last you many, many years and be a representation of you.

After many years of going "watch-less", I decided that JORD would be my watch of choice. It's because I felt like it would be a type of reflection of me, in a watch. I would be able to carry a piece of nature with me wherever I go, and by wearing it, I can also stand behind a company whose values are aligned with some of the things I feel strongly about such as sustainability and experiential living.

When I first visited the JORD website, I was amazed at how many wood finishes they had available - 13 to be exact. I browsed around and selected my favorite styles, one of which was one of their men's watches. Here's the one I was eyeing. Since many of their styles are unisex, it still would have been perfect, but I chose to go with something a little more me. I chose the Fieldcrest series in Maple. I love the simplicity and minimalist vibe it has going on.


HelloLovelyLiving.com | Jord Wood Watches | Fieldcrest in Maple
 

Okay, did you just see how pretty it is! I love the light, airy color of the wood. It legit matches my desk, not even kidding! See it here. That's how much I've been loving light, raw wood finishes.

When I opened up my package, I was greeted with a beautiful wooden box with a magnetic lid. Upon removing the lid, the watch rested on a jute pillow, and once I set my sights on it, I was blown away at how gorgeous it was. The finish was exactly as I envisioned, and it was perfect. By far, the most beautiful presentation I've yet to experience with a watch company. It's nice to know that such care and attention to detail also went into the packaging because I'm all about the details. 

 
HelloLovelyLiving.com | Jord Wood Watches | Stina is wearing Fieldcrest in Maple
 

The fitting of my watch was perfect, and I truly feel like I'm wearing a piece of luxury - natural luxury. It's just so beautifully crafted and made for me in every sense. The face of the watch features scratch-resistant mineral glass, and the buckle has a push button, making it actually fun and easy to remove. Let's be honest, I always hated how hard it was to remove watches! It's also interesting to know that the wood is finished and pretreated with tung oils, and if I ever need to clean it, I can use lemon or orange oil extract. Au naturale, just how I like it.

 
HelloLovelyLiving.com | Jord Wood Watches | Fieldcrest in Maple
 

Needless to say, I was very impressed with the presentation of the watch, the quality, and craftsmanship, the look, and how it makes me feel when I wear it. Everything. I can't say enough good things about my JORD Wood Watch, so I wanted to share a little bit of the love with you all by hosting a giveaway for those of you that are interested in getting in on a piece of the action. So, here it is!


JORD x Hello Lovely Living 

Giveaway

All entrants will receive a $25 consolation code once the giveaway ends. 

Open internationally. Giveaway ends on 4/23/17 at 11:59 pm CT.


I hope you enjoyed this post and that it offered a little bit of inspiration on how you can live out each moment more intentionally. For even more, catch me over on Instagram where I post on the daily! Keep on the lookout for more exciting giveaways like this in the future!

How do you experience the fulness of every moment? I'd love to hear about it in the comments below!

Disclosure: JORD reached out to me for this post and was so kind to send me a watch for honest review. As always, all thoughts and opinions are purely mine.


DIY | Minimalist Blush Pink + Foil Nails

Have you seen minimalist nail designs yet? A quick search on Pinterest, and your eyes will thank me. I've been gravitating toward them lately and decided to recreate a look that is so simple, yet so classy. Read on for more details!

 
HelloLovelyLiving.com | DIY Minimalist Blush Pink + Foil Nails | Essie Between The Seats Nail Polish
 

I always do my nails at home and love gel nails, so I've been using the Sensational Gel Kit for a while now. Since there are usually limited colors available, I switched to using the polish to gel transformer so that I can use any nail polish that I want. It's really simple and easy to use, and I get salon-quality results at home while saving so much money. I've linked some of the products that I use at the end of this post for your convenience.

You will need to purchase the kit at first because it does come with the LED light and other essentials that you will need for each application. After that, all you have to worry about repurchasing is the polish to gel transformer when you run out + any of the other items in the kit, which is a minimal expense. For a more detailed description of the Sensationail Gel Kit, click here to read my first impression review.


For this nail design, I used deco foil, which is basically foil that can be transferred to different surfaces. Here's the one I purchased. All I did was cut a strip of it and stick it to my nails, rub, then remove, and it created this very antique application. I just seal it with a coat of the polish to gel transformer. I am in love with how it turned out, and I can't wait to test out other nail designs using it. 

My gel nails do last for 2-3 weeks (or longer if I'm pushing it), so I have been pleased with the Sensational gel system for a long time. I honestly don't see myself really ever going to the salon any time soon! It does take me roughly 2 hours from start to finish to do my nails, which includes the removal time, filing, and all of that good stuff. However, I think it is so worth it, and I actually find it to be a therapeutic and relaxing process.


I hope you try this out! If you don't want to go with the Sensational system, you can always opt for the regular polish application, and I'm sure it would give you beautiful results as well. I just thought I'd share my process with you! 

If you need more inspiration on the daily, I post every day on Instagram + keep you motivated and inspired with uplifting content. I'd love to see you over there!

Did you enjoy this post? Any questions? Let's chat in the comments below!

 
HelloLovelyLiving.com | DIY Minimal Blush Pink + Foil Nails


Recipe | RAW Matcha Cheesecake With Fig and Almond Crust
HelloLovelyLiving.com | Recipe - Raw Matcha Cheesecake With Fig And Almond Crust
 

I'm kind of obsessed with matcha. Just a little. Okay, A LOT. The fun part is adding it to every and anything sweet. In this recipe, I decided to get a little creative and come up with a raw cheesecake recipe that included some of my favorite ingredients: matcha (of course), almonds, honey, mascarpone cheese, and figs. I mean, go big or go home, right? I did just that with this recipe. Do I miss regular cheesecake? Not even. Read on for the complete recipe and for more dreamy photos.

 
HelloLovelyLiving.com | Recipe - Raw Matcha Cheesecake With Fig And Almond Crust
 

So, what is a raw cheesecake anyway? For all of you who aren't familiar with it, it's generally made with a date-nut crust and cashew coconut-cream filling. There's absolutely no baking involved and no cheese, but you still get that creamy + fatty consistency without the guilt. Since I did still want to have some of that cheese flavor in this recipe + make it extra fancayyy, I added 4 tablespoons of mascarpone cheese. This is totally not necessary, so feel free to leave it out and just replace it with more coconut cream. But it's damn good with it. Just sayin'. You could even replace the honey and use a plant-based sweeter instead for a completely raw, vegan cheesecake.

 
HelloLovelyLiving.com | Recipe - Raw Matcha Cheesecake With Fig And Almond Crust
 

I also decided to switch it up a little and make a fig and almond crust instead of a date-nut crust that is typical of raw cheesecakes. In my opinion, it tastes even more amazing. Feel free to break the rules with this cheesecake. Make it into what you want it to be - add the types of toppings that you love, remove what you don't. It's completely versatile, and it's food. Play with it. I chose to top mine with crushed pistachios, sliced almonds, desiccated coconut (basically coconut flakes), and a generous drizzle of honey. Can someone just stop me right now?! This is sounding way too delicious. 


HelloLovelyLiving.com | Recipe - Raw Matcha Cheesecake With Fig And Almond Crust
 

What else can I say about this cheesecake so that I can stall and show you more pictures? Hmm ... It's amazing. It's damn delicious. And isn't it just pretty! Another thing I should mention is that I totally made this without having the proper tools. I only had a mini food processor, so this was truly a labor of love. I also didn't have a springform pan, so please please do yourself a favor and get one if you don't have one. It will make your life so much easier!

 
HelloLovelyLiving.com | Recipe - Raw Matcha Cheesecake With Fig And Almond Crust
 

So, there's that, my loves. A ton of photos to get you salivating before you tackle the hard part - running to the store to get all of the ingredients to make this bad boy! Actually, this cheesecake is super simple. Just make sure to soak your cashews the night before so you're not like me, wishing I did so I could enjoy this cheesecake a lot sooner. Happy non-baking. Oh yeah, I forgot to to say that this is perfect if you hate baking or are horrible at it. Sorry, I'm done, let's get into the recipe (finally)!

 
HelloLovelyLiving.com | Recipe - Raw Matcha Cheesecake With Fig And Almond Crust
 

Raw Matcha Cheesecake With Fig And Almond Crust


Servings: 8 servings
Prep: 30 mins
Cook: 0 mins
Total time: 30 mins

Ingredients


Crust

  • 1 cup dried figs
  • 1/4 cup almond flour

Filling

  • 2 cups cashews (soaked)
  • 1 can coconut milk (1/2 of the cream portion only)
  • 2 Tbsp coconut oil
  • 4 Tbsp mascarpone cheese
  • 1/2 cup raw honey
  • 2 tsp matcha powder

Toppings

  • pistachios (lightly chopped)
  • honey
  • almonds (sliced)
  • desiccated coconut

Instructions

  1. Cover and soak the cashews in water for at least 4 hours or overnight. Refrigerate the coconut milk.
  2. Line the bottom of an 8" x 8" springform pan with a round piece of parchment paper. To prepare the crust, using a food processor, mix the dried figs and almond flour until it comes together when pressed. Press evenly into the bottom of a springform pan. Set aside.
  3. Strain the chashews. To prepare the filling, process the cashews until it starts resembling a creamy texture. Open the can of coconut milk and use half of the solid, cream portion only. Do not use the liquid portion. Add the coconut cream to the cashew mixture and mix until well combined, then add the reamining ingredients and mix until well combined and until an smooth, creamy texture has formed.
  4. Pour the filling into the springform pan and spread evenly. Cover with plastic wrap and freeze for at least 4 hours to set.
  5. Remove from the freezer and release the springform pan. Place on a serving dish of choice. You may need to even out the top of the cheesecake with a spatula if it is not completely smooth.
  6. Decorate with toppings around the edges: lightly crushed pistachios, sliced almonds, and a drizzle of honey. Dust lightly with desiccated coconut.

Notes

  • Store in the refrigerator or freeze for longer periods.
  • For a vegan option, remove mascarpone cheese and substitute with the other half of the coconut cream. Instead of honey, use a plant-based sweetener.
  • Organic ingredients are preferred.


Wasn't that just the easiest! FYI, I had a slice for breakfast and it was totally one of those moments where I had to pinch myself. I mean, cheesecake for breakfast!?! What world is this!?! Happy clean eating!

Will you be trying out this recipe? If you do, I'd love to see your photos! Go on, tag me in your photos on Instagram using #hellolovelyliving and @hellolovelyliving so I can get all heart eyes on your photos + share them so others can do the same! 


HelloLovelyLiving.com


Minimal Home Office + $250 Minted Giveaway

One of my most popular posts on Instagram was a photo of my desk situation, so I thought it would be fun to dedicate an entire post to my little creative area. Keyword: Little. I claimed a cute, albeit small spot in my living room, which has been the perfect location for getting those creative juices flowing. I mean, all I need is a desk, really - and an area for my plants. All worked out well except for one thing. My walls needed some love. Major big deal.

I'll be sharing my updated space + a huge giveaway at the end, so read on for more!

 
HelloLovelyLiving.com | Minimal Home Office + Minted Custom Art Prints
 

Okay, so the walls directly above my desk were bare. Zero inspiration to be found on these beige walls. I know, sad story, right! That had to change, so when Minted got in touch with me again, I was like, "Yes. Yes. And Yes!". Okay, maybe not that many yeses, but in my mind there were. I needed some pretty prints on my walls, and they are my go-to when it comes to exactly that, so it was perfect!

If you're not familiar with Minted, it's an online marketplace for independent artists from all over the world. There you can find art, stationary, decor, gifts, + more for all of those special moments and events in your life. If you truly want unique art products that you can't find anywhere else and love to support independent artists, Minted is the place to shop (speaking from experience)!

 
hellolovelyliving-travel-rawlings-64.jpg
hellolovelyliving-travel-rawlings-59.jpg
hellolovelyliving-travel-rawlings-63.jpg
 

So, if you follow me on Instagram, you might know that I made a trip to Maryland in November and visited the Rawlings Conservatory & Botanical Gardens in Baltimore. Let's just say that I took a million and one photos there. Obviously. This is me we're talking about here. Haha. This was the perfect opportunity to print some of them. 

Seen above are a few of the many photos that I fell in love with from my shoot. Aren't they just gorgeous! Surprisingly, I was able to quickly decide on two photos that I wanted to make into custom prints. I also decided on my heart + hustle digital print, which is available for instant download in my shop.

 
HelloLovelyLiving.com | Minimal Home Office + Minted Custom Art Prints
 

Here it is - my minimal office space with my Minted custom art prints on display! Do you like it?? The Ruffled Feather print on the left is a Minted print that I already had, followed by my new custom photo print in the middle, and my heart + hustle digital print on the right. The awesome thing about Minted is that you get to choose what type of frames you want, and they have so many pretty options. 

 
HelloLovelyLiving.com | Minimal Home Office + Minted Custom Art Prints
 

No to mention, you can also choose from different sizes, so you really can get creative with how you want your prints to look. I chose to go with a white frame for my photo print and a speciality brass finish for my heart + hustle print. I love the look of things not looking too matchy-matchy because it adds a lot more interest.

 
HelloLovelyLiving.com | Gallery Wall + Minted Custom Art Prints
 

I decided to add my other new custom photo print to my existing gallery wall in my living room to freshen it up. I chose to go with a wood frame, and I'm so obsessed over it. I also removed some older prints and instead added some small playful details that I am absolutely loving. The Joy is Sexy print is also another one of my digital prints that is available in my shop, and the brass frame is from Target. The Let's Get Lost print is from Minted as well, and the mirror is from Ikea, which I just spray painted a brass color.

If you're interested in creating custom photo art prints on Minted's website, here's exactly what to do: Search "custom prints" in the search bar, which brings you to the exact page that displays all of the available design options. Under the filter options, go to "Type", and make sure to check the "Custom Photo" box. There you will see all of the available options for custom photos. I went with a blank template where I could print my own design/photo.

Once shipped, everything is professionally packed and secured so that your prints are safe and free from the possibility of getting damaged. I am always so excited to open my prints because they always turn out so beautiful!

I'm so in love with my custom prints, and to share the love, I wanted to partner with Minted for a Valentine's Day Giveaway for all of you to have a chance to win something amazing! One winner will receive $250 in Minted credit! To enter, simply click the button below and enter your information.


minted x hello lovely living

Giveaway

 Open to US residents. Giveaway runs from 2/1/17 - 2/8/17 11:59 pm PT.


Here are a few last minute Minted Valentine's Day gift ideas that I think you will love!

 
HelloLovelyLiving.com | Minted Minimalist Quote Keepsake

Minimalist Quote Keepsake

Pair a favorite quote + photo for a more meaningful touch.


HelloLovelyLiving.com | Minted Petite Pairs

Petite Pairs

Pick a pair of limited-edition art prints to fit his/her personality.


From Tues 1/31 - 11:59 pm PT on Wed 2/1: receive Free standard (ground) shipping on art & gifts orders $75+ with promo code: VDAYSHIP

Order art gifts by Wednesday, 2/1 for 2/13 delivery


I hope you enjoyed this post and that it got you inspired to add some love to your walls this year! It's actually really simple to do, and if you need any help with your next project, give me a shout! I'd love to help.

How do you make your office space an inspiring place? I'd love to hear about it in the comments below!

Disclosure: Some affiliate links were used in this post. I partnered with Minted on this post and received complimentary products. All thoughts and opinions are genuinely mine.

 
HelloLovelyLiving.com | Sharing Is Caring


Recipe | Creamy Thai Tea
HelloLovelyLiving.com | Creamy Thai Tea Recipe

If you have been following me along on Instagram, you'll probably already know that I love me some THAI TEA! I first discovered my love for this yummy drink back home on Guam where I used to have it at my favorite local Thai restaurants - Ban Thai and Chaopraya Thai Cuisine. I am obsessed with Thai food, so I've learned to make many Thai dishes while away from home. I love to make Panang Curry, Tom Yum Kung (hot and sour shrimp soup), Tom Kha Gai (chicken coconut soup), and Pad Thai (stir-fried noodles). As you can tell, Thai food has my heart (and tummy).

HelloLovelyLiving.com | Creamy Thai Tea Recipe

Naturally, Thai tea is also on the menu because, who says I can only have Thai tea once in a blue moon! Once I learned just how easy it was to make this creamy and delicious slice of heaven at home, my life was made. Needless to say, I've been hooked ever since! Now, whenever the craving calls (which is quite often), I just whip some up in no time and have my fix without every having to set foot into a Thai restaurant. Let me teach you just how simple it is to make!

HelloLovelyLiving.com | Creamy Thai Tea Recipe

For the record, homemade Thai tea tastes nothing like the can or jar variety you see in stores. It tastes a zillion time better. Not even kidding about the zillion part! As they always say, fresh is best! My favorite part about making Thai tea is mixing it. I feel like an artist every time I stir the tea in with the cream. It's one of those satisfying moments where my eyes light up and I'm debating whether I'd rather stare at it or drink it. Of course, that doesn't last too long. Drinking it sounds waaaaaay better! Anyway - as if you needed any more convincing from me that you need to make this delicious concoction! Let's get into the recipe, shall we!

HelloLovelyLiving.com | Creamy Thai Tea Recipe

To make this deliciously legal drink, you'll need Thai tea mix, which I was able to find in my local Asian store in Oklahoma City, Super Cao Nguyen. It is also available online, which may be a much easier option for you. Here's the Thai tea mix that I use. You'll also need the basics: sugar, water, ice, and half and half. I prefer not to use sweetened condensed milk or evaporated milk for my Thai tea, but if you'd like to go the traditional route, that's totally up to you! I also love to use almond milk, but I've discovered that half and half tastes way better.  

HelloLovelyLiving.com | Creamy Thai Tea Recipe

So, what you'll need to do first is add 2 cups of water to a small saucepan and bring it to a rolling boil. Since this is a loose leaf tea, you'll need to use a strainer. I poured the boiling water into my glass jar (that has a strainer lid) and then added in 2 tablespoons of the loose leaf tea. I let it steep for 3 minutes or until it develops a deep color. I take a separate jar and pour the strained Thai tea into it so that the tea doesn't continue to steep. Now I add 5 or 6 tablespoons of sugar, which quickly dissolves since the tea is still hot. After this, it is preferable to let the tea cool first before you use it, but since I am impatient, I always skip this step.

HelloLovelyLiving.com | Creamy Thai Tea Recipe

Now, for the fun part! Fill your cup full of ice, then pour in 1/2 a cup of the Thai tea. Next, pour in 1/4 cup of the half and half. The ice will water it down a bit, so that's why we added a lot of sugar to the tea so it balances out. Stir stir stir, and enjoy to your heart's content! Take the leftover Thai tea that you made earlier and store it in the refrigerator for when you're feeling like having a quick fix. It will be enough to serve you 2 more drinks! 

HelloLovelyLiving.com | Creamy Thai Tea Recipe
 

Creamy Thai Tea Recipe


Servings: 3 servings

Prep: 5 mins

Cook: 5 mins

Total time: 10 mins


Ingredients

  • 2 Tbsp Thai tea mix
  • 2 cups water
  • 5-6 Tbsp sugar
  • 1-2 cups ice
  • 1/4 cup half and half

Instructions

  1. In a small saucepan, bring water to a rolling boil. Pour water over thai tea mix and steep for 3 minutes.
  2. Strain and pour the tea into a separate jar, then add the sugar. Mix well until dissolved.
  3. Fill your serving cup with ice, then pour in 1/2 cup of thai tea, then 1/4 cup of half and half. Stir and enjoy! Save remaining tea for later. Makes 2 more servings.

Notes

  • You can also substitute the half and half for your milk of choice, or for the traditional version, condesnsed milk and evaporated milk.
  • I use organic half and half and organic raw sugar for the best quality and taste.


I hope you enjoyed this recipe! Be prepared to get addicted to it if and when you try it! It's one of those things that went from Thai Tea Tuesday to Thai Tea Every day for me. 

Will you be trying out this recipe? If you do, I'd love to see your photos! Go on, tag me in your photos on Instagram using #hellolovelyliving and @hellolovelyliving so I can get all heart eyes on your photos + share them so others can do the same! 

Disclusure: Affiliate links are used in this post.

HelloLovelyLiving.com | Sharing Is Caring


Modern DIY Kids' Furniture for Design-Obsessed Moms
HelloLovelyLiving.com | Modern DIY Kids' Furniture for Design-Obsessed Moms

Design-obsessed moms. I know you're out there! So, what to do when your child's room is more like an eye-sore rather than a room you can be proud of in your home?

And what if you don't want to spend a complete FORTUNE getting your kid's room looking Instagram-worthy?

Or what if you've already created the most epic space for your kids and are looking for more modern furniture ideas? 

Why yes, of course. I can help you with that!

Read on in my latest Mode story for modern kid-friendly furniture DIY projects that won't break the bank - giving you that sigh of relief that you can still pull off that look for less for your littles. Now say that ten times. Haha. 

Are you a design-obsessed mom? What is the one thing that you are most annoyed by when it comes to decorating your children's room(s)? I'd love to hear about it in the comments below!


Week In Photos: Instagram Recap

Ok. I'm kindaaa obsessed with Instagram. AGAIN. Just when I was starting to move away from the platform, they pull me in with their new feature. Have you seen it yet? Instagram Stories. It's like Snapchat, but without the fun filters, but that's okay. In time, I'm sure they will come out with something that's as equally addicting as Snapchat. I just love how everything is on one platform now because I just can't keep up with it all. I sucked majorly at Snapchat, so I'm glad that this all happened. I also like how I am able to post things in my stories that don't need to stay on my wall because I can get pretty anal about the look and feel of my feed. In that sense, I am so loving it and plan to share a little more on there that is more candid and hopefully you can get to know me a lot better and get a better feel of the chick behind the screen. 

With all that said, I wanted to start doing a weekly roundup of my week in photos. Since I started Hello Lovely Living, I have developed a love for photography, particularly nature, styled photos, still life photography, and flat lays. I want to continue to explore where this will take me because I just love doing it, and it really gets me excited to create - be it  through taking photos, creating DIY projects, painting, writing, and the list goes on. I take photos of it all! All the photos you see here on Hello Lovely Living and on any of my social media channels were taken by me unless I specifically tag the source - then all credit goes to that person. I am all about sharing original content, so I do my best to create my own stuff. As an artist, I think creative control goes hand-in-hand, so I understand how it feels to feel proud of the things I create. It's liberating and exhilarating.

Anyway, before I go into a totally different tangent, I just thought I'd share that all with you guys. I hope you find inspiration in these images and that you get more of a glimpse into my world.  

Without further ado, last week's recap in photos. 

August 1-8 | 2016

So, did you enjoy perusing through my photos like a stalker? Kidding! I'm allowed to joke once in a while, right?! I may not be good at it, but I try! Hahaha.

I definitely enjoyed putting this together because it gives me a mental recap of my life in a way. Sometimes life can pass by so quickly, so it's nice to take a minute to reflect on the more valuable things in life like memories. It's so important to be grateful for every single thing, and I am certain this was just that exercise I needed. 

If you liked what you saw and want to stalk me some more *wink wink*, you can see the rest of my photos on Instagram and give me a follow. There, you can also take a look at my original captions, and hopefully they will inspire you in some way and give you the occasional giggle. Hope to see you there!

So, tell me, which social media platform do you prefer? I'd love to hear what you think in the comments below!

Hello Lovely Living | Sharing Is Caring


DIY Furniture | Kids Scandinavian Tripod Table
HelloLovelyLiving.com | DIY Furniture - Kids Scandinavian Tripod Table

Please tell me why I would decide to make a table instead of going the simple route and just buy one like normal people do. I'm adding that question to the list of others that seem to escape me because this is one of those projects where I had to stop (on several occasions) to scratch my head and ask myself, what have I gotten myself into!? At the end of the day, it was totally worth it, but let's be honest, getting there was far from a walk in the park.

I now probably have a degree in painting from all of the articles that I devoured and the troubleshooting I went through to complete this project. Little did I know that painting a table is not as basic as it sounds. All I know is that I'm happy to share everything I learned and then some so that this project will be a breeze for you. In other words, I'm happy to have been your guinea pig! That's what DIYs are for, right.

In the mayhem that was this project, I decided that by taking photos, I would probably sabotage myself even more, so I opted not to do so. I do, however have the process down in my memory, so hopefully you don't mind that I don't have any photos of the process to share. 

For starters, it is very very very - and I mean VERY - important to sand down the wood before you proceed with anything. Call me dumb, but I decided that I could just skip that process. Soooo ... long story short, let's just say that I was kicking myself in the butt for it. Another important step is to use primer, then sand, then primer, then sand, and repeat that process until you have a smooth base for your paint. For me, it took several times to achieve a flat surface because I did run into problems with my wood having cracks in it, which I was supposed to fill in with wood putty, but thought I could skip that step as well. 

Since we're on the topic of wood having cracks in it, I also learned (after the fact) that all wood isn't created equal and that certain wood is better for painting and attaining a smooth finish. I did not know this, so I had to deal with the pine that I had already purchased. I don't have anything against pine, but if I had known that there were better options, I probably would have went with those instead so that I didn't have to deal with so many knots and cracks in my wood. Since pine wood has so many knots, you will have to use a primer that will be able to hide them and keep them from peeking through in the future. You may also have to apply wood putty to fill in holes or uneven spots. It was an easy option considering it was pre-cut, but if you want to explore other options, I encourage you to do so.

For the most crucial step - the paint - this is where things got really complicated at first. I decided to use an oil-based paint instead of a water-based paint, in other words, latex paint. An article I read suggested that it was the best choice for tables that receive a lot of use because it stands up to wear very well. What I did not know at the time was that oil-based paint takes longer to dry, can not be washed off of brushes (unless you use turpentine), smells really really bad, can be harmful, and is not eco-friendly! *yikes* So, I learned after the fact that maybe I should've just went with a latex paint, and my life would've probably been way easier and less stressful. 

Seeing that I was able to complete this project (finally) after several weeks due in major part to roadblocks and troubleshooting, I am still so pleased with the outcome, and I'm so proud of it. It was so worth every headache because I learned so much from this project. It's actually a really easy project once you know what you're doing. #notetoself

I just wanted to be completely transparent and honest with you guys beforehand about my experience. If you decide to do this project, here's the step by step of what you need to do to achieve the exact same thing. It'll be way easier for you now that I have all of the techniques figured out and outlined. I do recommend you decide on what type of paint will work best for you, though. If you decide to use latex paint, please do some research first as to how to use it since that's not the paint that I will be using for this project. You'll be surprised as to what a difference a little technique or Google search will do for you and the outcome of your project. 

HelloLovelyLiving.com | DIY Furniture - Kids Scandinavian Tripod Table

supplies


HelloLovelyLiving.com | DIY Furniture - Kids Scandinavian Tripod Table

Instructions


I recommend you do this project in an area without a lot of wind, but with good ventilation like a garage. 

Sand

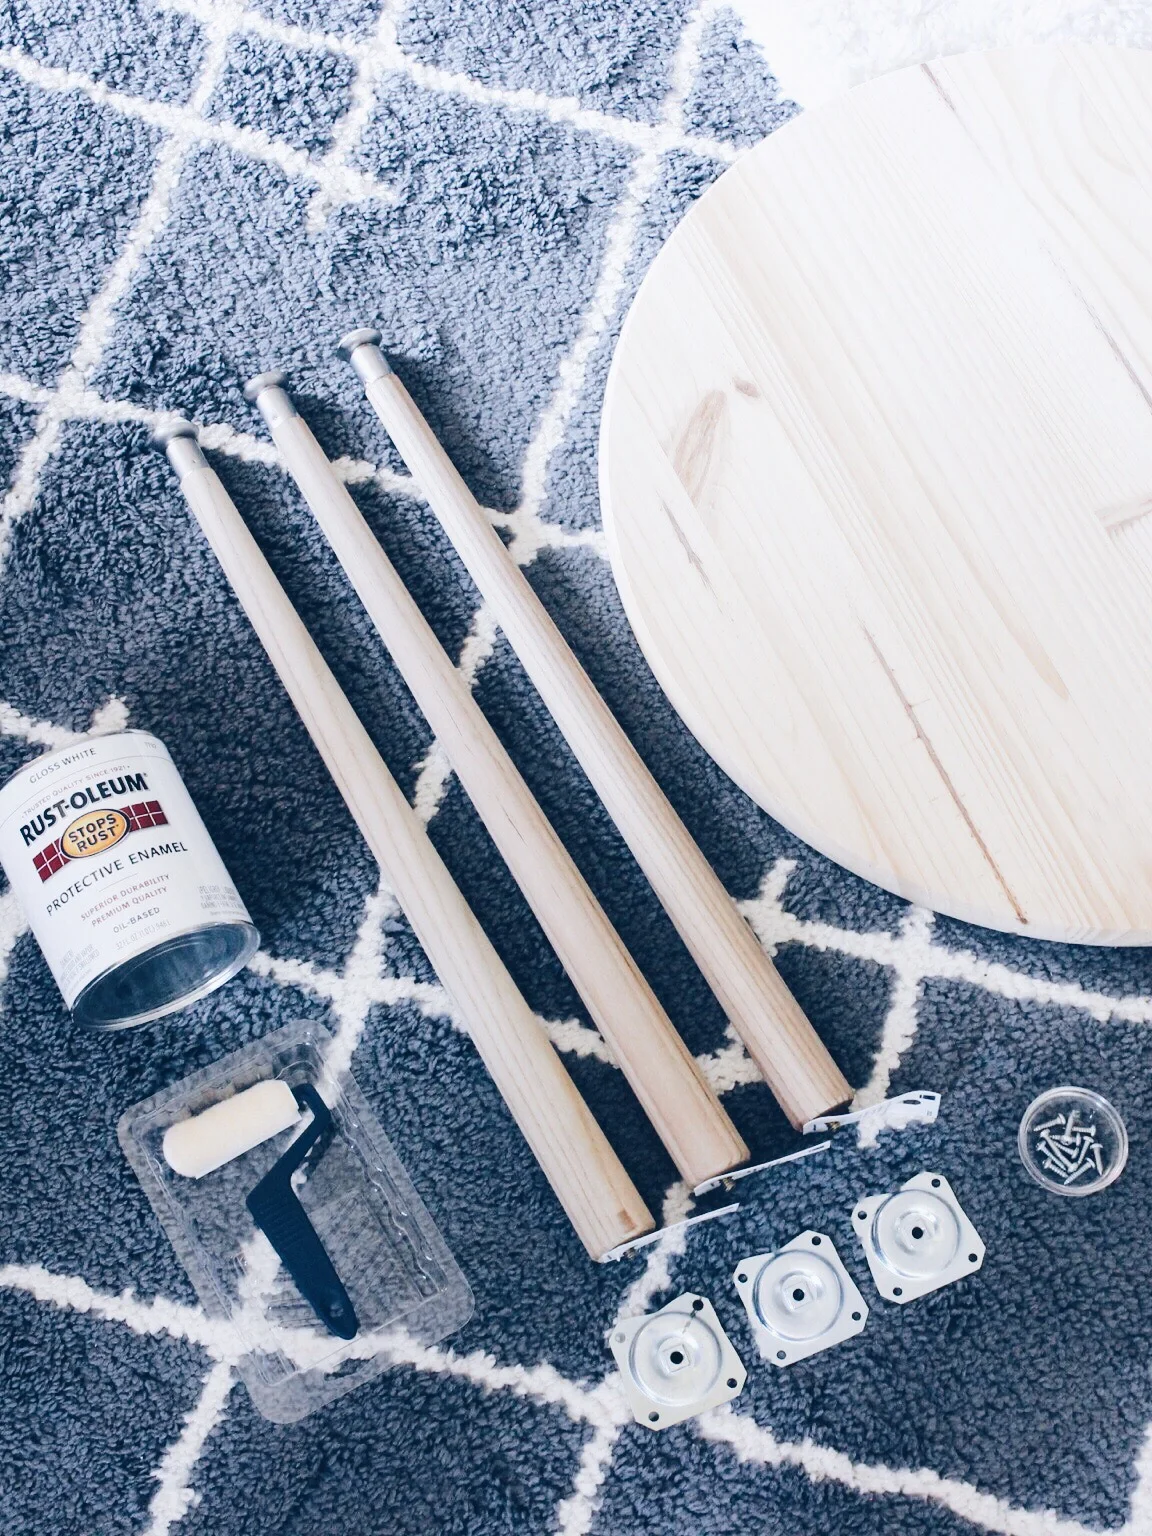
The first thing you'll need to do is to sand the pine wood round to get a smooth base. I would recommend using the 120 grit for rougher areas (the edges of the table), then go over it with the 220 grit paper. For the top of the table, I used the 220 as it is a lot smoother. Remove excess dust with a tac cloth.

Prime & FILL

Spray a thin layer of primer in long strokes with the grain of the wood. Let dry for an hour, then sand with 220 or 120 grit sand paper. Remove excess dust with tac cloth, then repeat steps until you feel like you have a smooth finish. I primed and sanded my table 3 times, but it just depends on your individual results. After the first coat of primer, you will notice that the imperfections will start to show, like scratches, dings, and cracks. If they are not that bad, the primer will fill them in, but if they are deep, you will need to fill them in with wood putty or filler. If you do use wood putty or filler, all you would do is apply it according to the package directions, let it dry, sand smooth, wipe with tac cloth, then add another layer of primer and continue with the process that I've mentioned beforehand.

Paint

The key to getting a smooth finish is to have a smooth base to work with, so I can't stress enough about the importance of sanding as well as removing all dust particles and impurities before you paint. Once you have that covered, you are ready to roll - literally! Working with oil-based paint is a little tricky, but the key to applying it is to not apply it too thick because it will take longer to dry and it will run - oh it will RUN - and you don't want to be like me, stuck sanding it all down again. I learned the hard way.

To apply, use long strokes along the grain of the wood and try not to go over the same spot you painted too many times or it will drag. Since oil-based paint takes longer to dry, it will smooth out, so don't worry too much about getting it completely perfect. I recommend applying paint to the top of the table first, then to the sides of the table (remember, thin coats). Allow your paint to dry completely; dry time will vary by climate. This can take anywhere from 24-72 hrs to weeks, so patience is a virtue here. 

Before you apply your second coat, look for any areas where dust or particles may have entered and sand those areas down with 220 grit sand paper. Completely wipe your table down with a tac cloth to make sure you have a clean surface. To apply the second coat, apply as you did the first. Two coats should be all that you need, but it really depends on your preference. I had to do 3 coats, but that's because I messed up and had to sand down the drips from the second coat I did.

Allow your table to dry for several weeks because the fumes will be strong for a while. Oil-based paint also takes a while to cure, but you can still use it. In the meantime, just be careful not to bang it or it will dent. Once it is fully dry, the finish will cure and harden. 

Legs

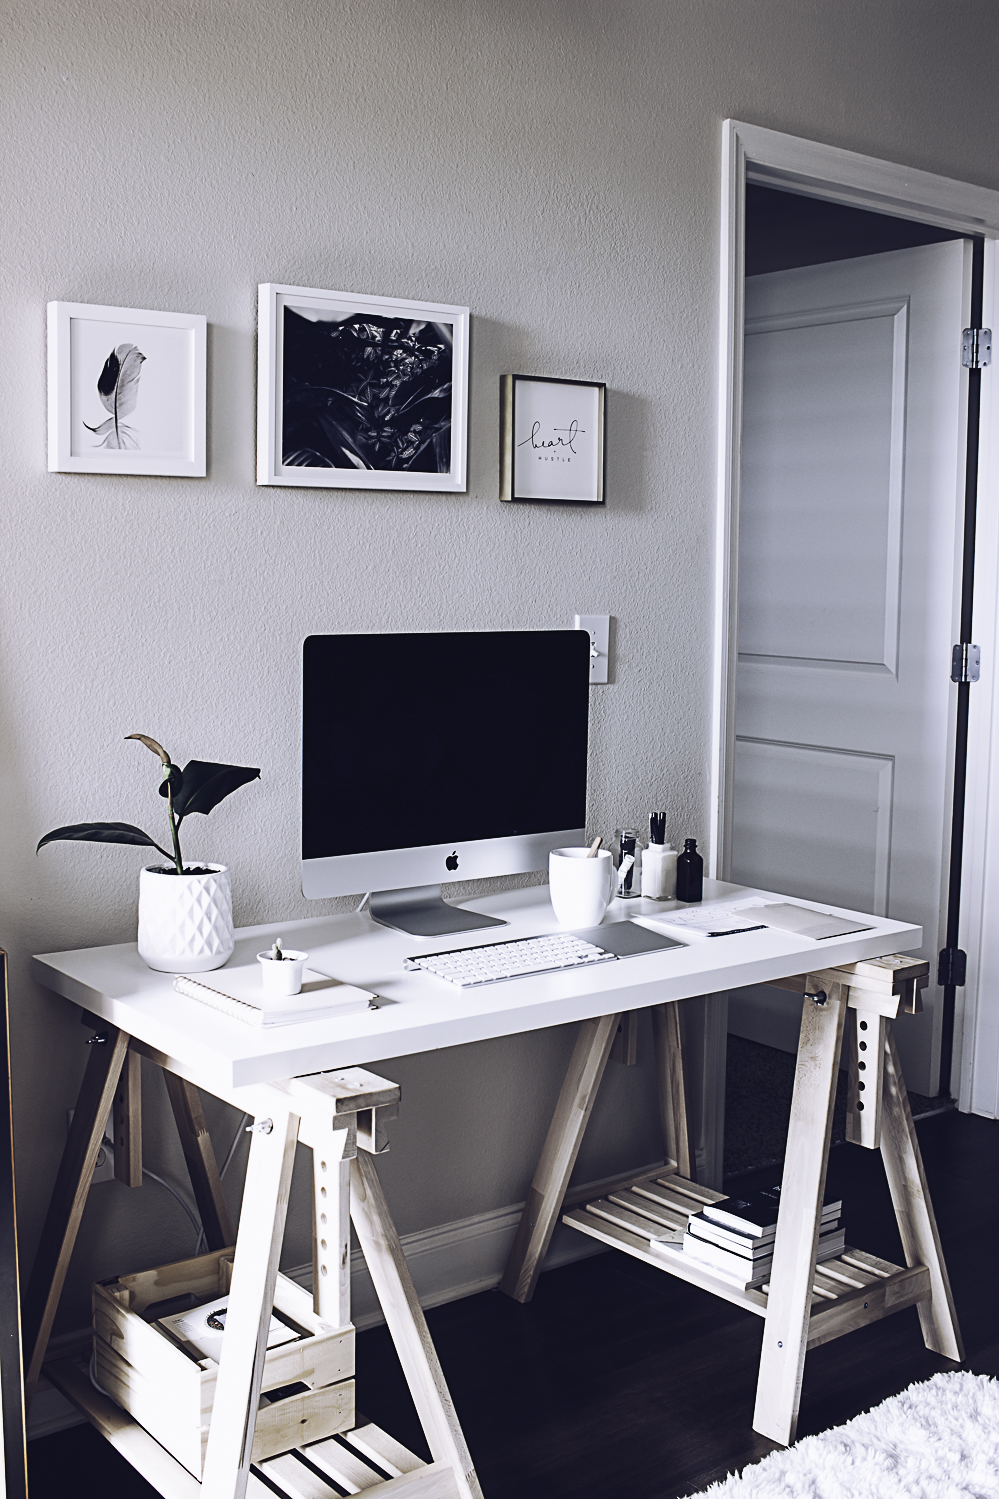
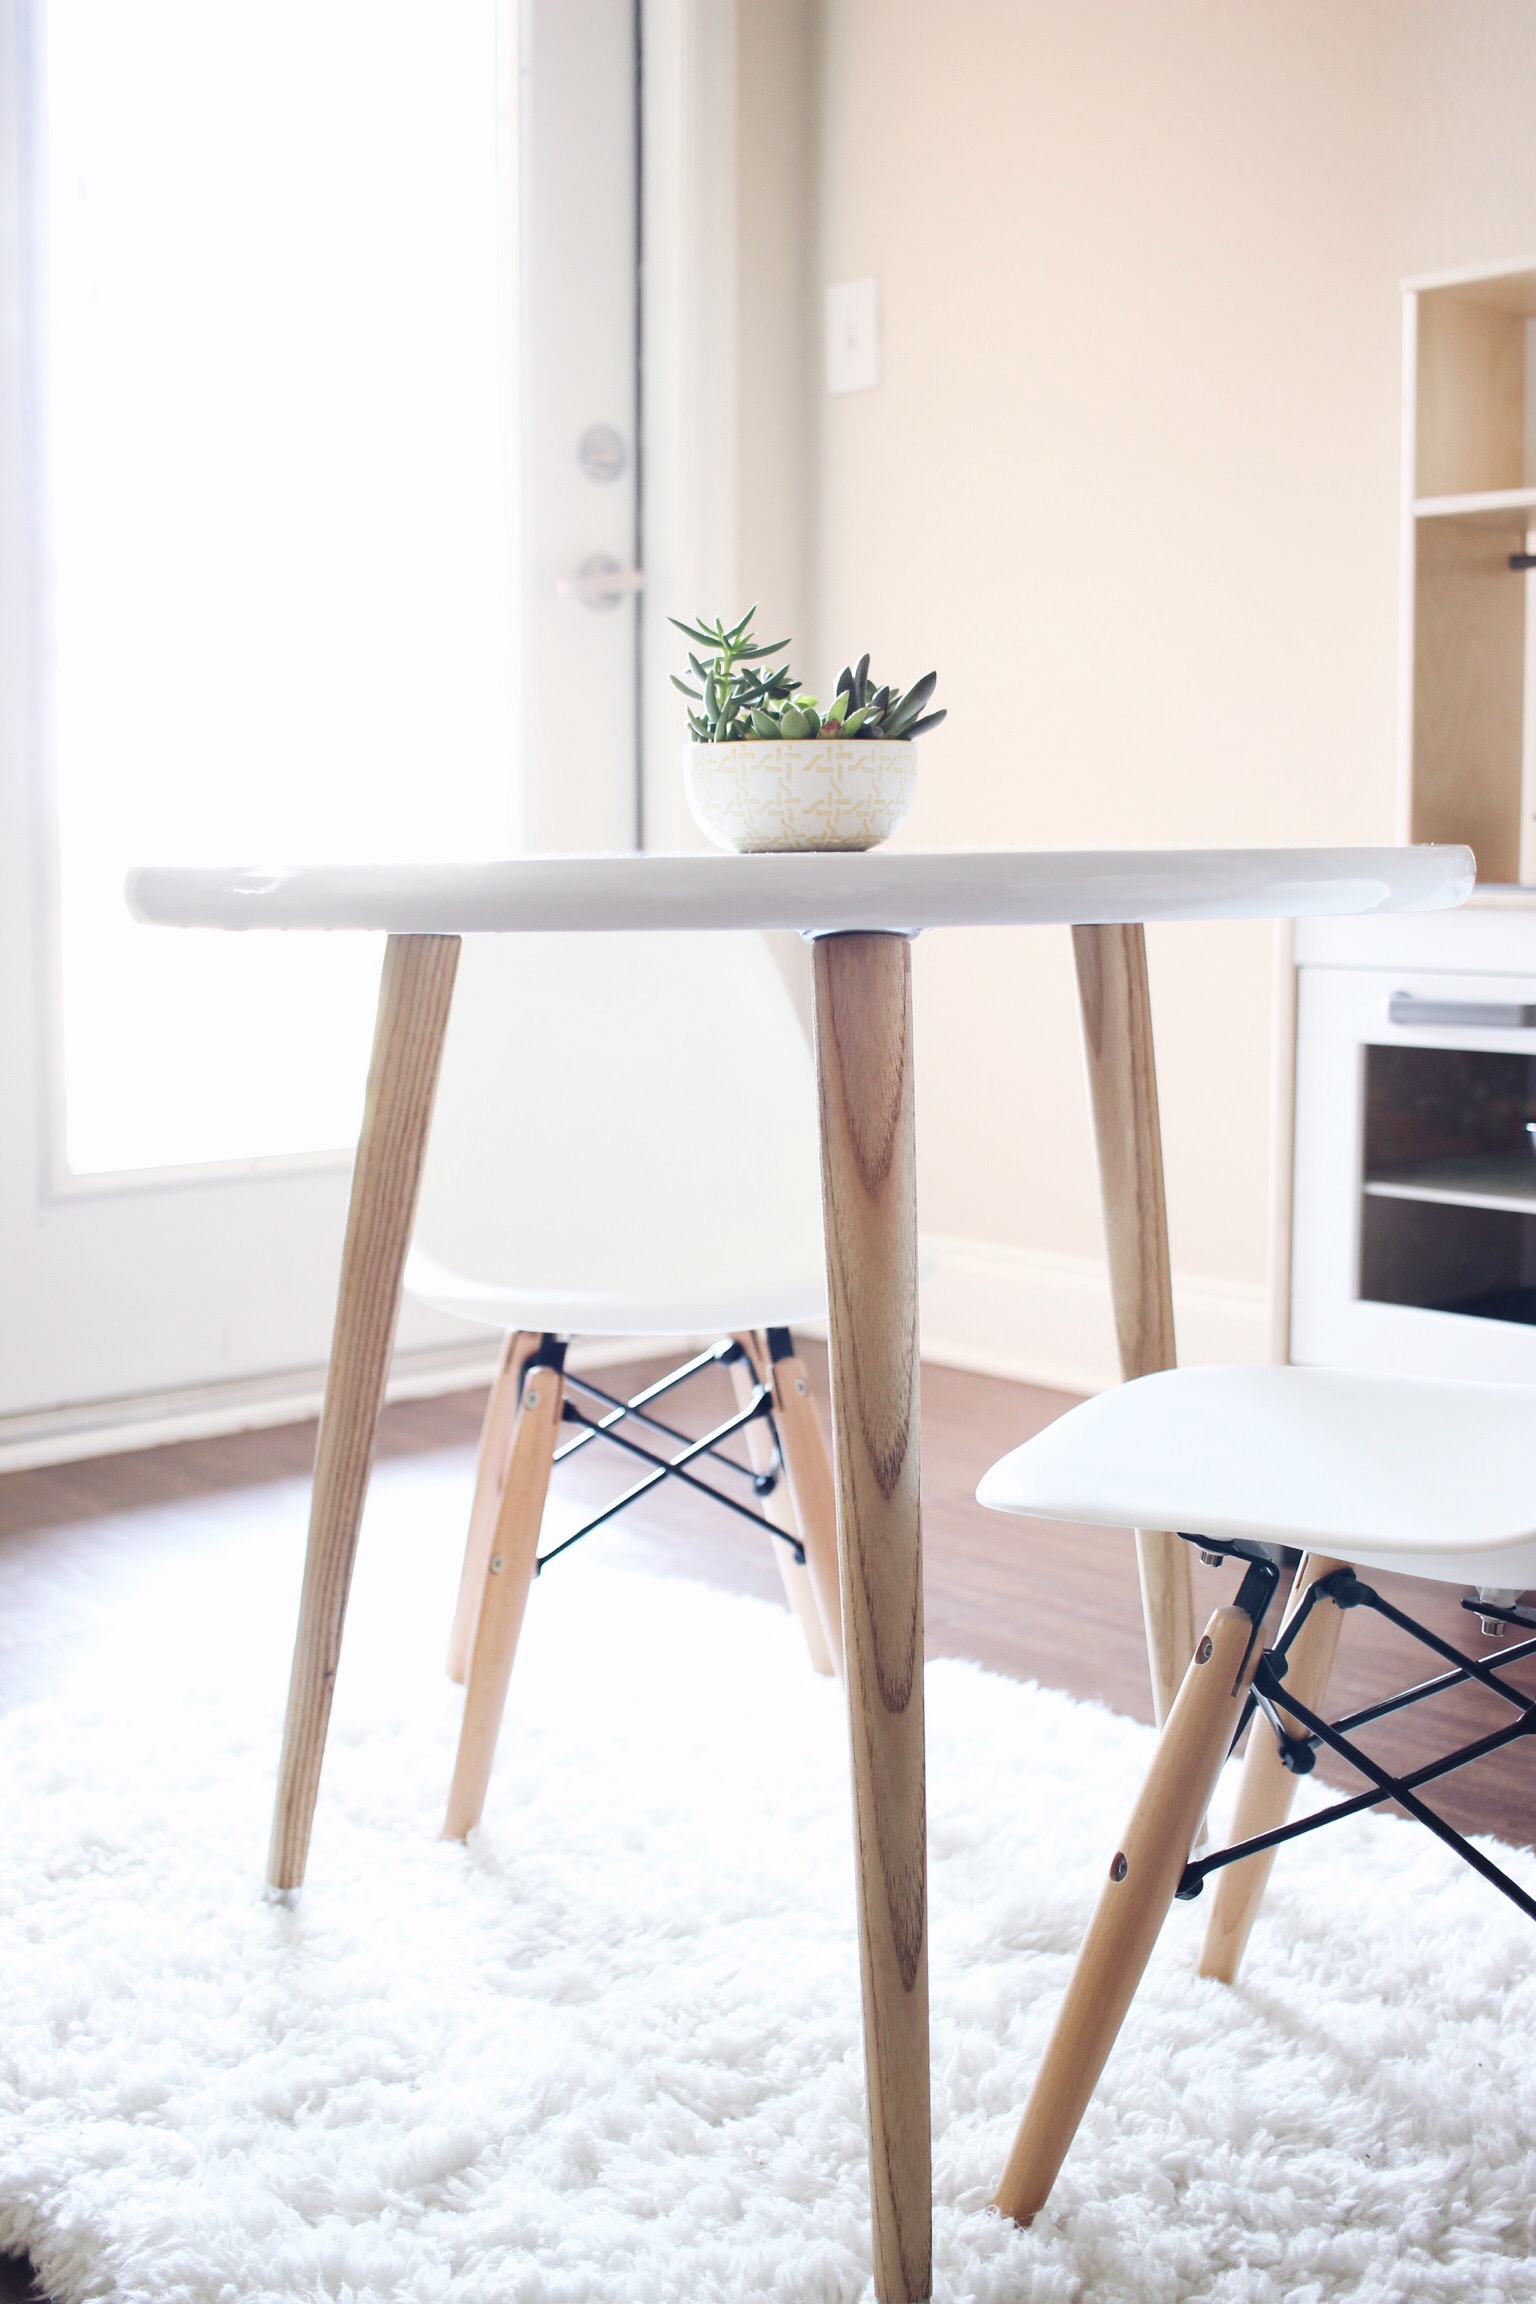
For the legs, I do recommend installing them to your table before you apply the polycrylic gloss. To do this, you will need to first measure your table's circumference with string, which will roughly be 75", then cut the string into thirds (25" each). Using the string that you just cut, lay it out along the circumference of the table. At each end, this is where you will mark your spots for where your legs will be installed. Mark your spots at a 4" depth from the edge of the table. Now you can place your top plates on and get to drilling. Make sure that your top plates are angled outward first. It's a simple step that can be overlooked. Mark all four holes on each top plate as a guide, then drill in place. Once that's all done, you can now screw on your legs. 

Now it's time to paint your legs with the polycrylic gloss. I didn't sand mine, but I do recommend you do so to get a smoother finish before you paint. Mine turned out just fine, so it's up to you. Since the polycrylic base is water-based, the wood grain will raise a bit, which you'll either want to sand smooth or you can leave be (which I did). I just used one coat to maintain that natural finish. Let the legs dry for an hour and they're good to go!


HelloLovelyLiving.com | DIY Furniture - Kids Scandinavian Tripod Table

That's a wrap for this project! The play kitchen from Ikea was a nice surprise that I ran into while on my trip to the Dallas location, so I had to snatch it up. I think it looks amazing alongside the table! I am going for a Scandinavian look for his play area and for our home, so it's coming together very nicely. I did have a moment where I was considering going for a Scandinavian whitewashed finish, which also would've been pretty. I was able to find the plastic Eames chairs at Hobby Lobby - and they were on SALE! Big win for me. My small succulent arrangement is perfect for this small-sized table, and Uriah doesn't even mess with it. Don't be scared to use white. These are all materials that are easy to clean up and maintain. Uriah has already drawn on the chairs, and it was a cinch to remove.

HelloLovelyLiving.com | DIY Furniture - Kids Scandinavian Tripod Table

This project was so worth it. I mean, look at this space! I'm in LOVE. Uriah has been enjoying his little setup, and he can finally have his own kitchen to play in. He's all about being in the kitchen with me, so I just had to do this for him.

Do let me know if you try this project out and if you have any questions, I'd love to help. It will be 100% worth every ounce of love and sweat you put into it! 

Did you enjoy this DIY? I'd love to hear your thoughts in the comments below!

HelloLovelyLiving.com | Sharing Is Caring


DIY Modern Plant Stand Projects Because #PlantLady
DIY Modern Plant Stand Projects Because #PlantLady | HelloLovelyLiving.com

via The House That Lars Built

Being a plant lady these days bring me great, great joy. Never in my wildest dreams would I have imagined how happy plants could make me, but they do.

Could I survive alone in a jungle? Probably.

Yes - that's how happy they make me, and maybe some of you can relate to my obsession.

Lately, I've been wanting to get my hands on every known modern plant stand out there at the moment.

Of course, not one of those has made its way into my home (YET), which makes me very sad.

So, in the meantime, I decided to compile a roundup of DIY Plant Stand Projects that makes waiting one more second that more bearable until my hubby lets me start on another DIY project.

Let's just say, I have a lot of projects that he'd like to see completed before I start on a new one!

Hopefully, I can start on another project soon enough once I share my latest project with you all, which I have nearly given up on but keep faith that it will soon come together. The struggle is real! #PrayForStina

I hope you find a project you like below in my latest Mode story and try your hand at it. Most of them are super easy to make. Have fun my fellow plant chicas!

Sharing Is Caring | HelloLovelyLiving.com


You'll Never Look At A Paper Bag The Same Way Again
You'll Never Look At A Paper Bag The Same Way Again | HelloLovelyLiving.com

via My White Obsession

How many times have you collected a million and one paper bags and asked yourself, now what am I going to do with all of these things? Well, now, I've got the perfect solution for you that'll actually improve your quality of life. Read on in my latest Mode story below - and don't mind the silliness that is my writing. It's 2:25 in the morning and your girl is lacking sleep! :)

Sharing Is Caring | HelloLovelyLiving.com


Moodboard | Modern Nordic and Boho Inspired Outdoor Space

Living in Oklahoma, being outside to enjoy the weather is a luxury. Not only is the weather bipolar, but it is either extremely cold or extremely hot for the most part of the year. In between, we're lucky to enjoy a good day or two during the week that is perfect - and for me, that means weather in the 70s - 80s! 

Now, being that I'm from an island, you can imagine how extreme this can be for me because what I'm used to back home on Guam is one of two things: rain or shine. Guam's two seasons - wet and dry -  means that if the sun isn't out, it's raining, but for the most part it's beautiful year-round. I miss being able to predict the weather almost every day and be able to enjoy outdoor activities. Since I feel serious deprivation, I jump on any opportunity to go to the park or just drive around to enjoy a good, sunny day and warm weather.

One of the things that I've been wanting to do is create a nice outdoor space on my patio so that I can enjoy any good weather on a moments notice. My sons and I enjoy going outside to get fresh air and enjoy the scenery, and we do get a nice view of the sunset, but one thing prevents us from staying outside for too long; The space is empty! I mean, let me elaborate on that. I have no furniture, no chairs, just a small wooden box with a marble slab on top to hold some plants, but that's it! I would show you a picture of it, but seriously, it's that embarrassing. 

It's been on my mind to do something with the space, but I just haven't had the budget to actually make it something worth doing. So, I've been searching for DIY projects on how I can make things myself for pennies of what it would cost to purchase something at the store. I've found a few DIYs, but not many that are simple and that don't require me to have some level of woodworking expertise or following-directions expertise (in my case). Measurements make me nervous.

So, when Douglas Elliman contacted me to be a part of their Florida Room Challenge, it came at the perfect timing. I had just come back from a family vacation from Florida - which I didn't want to come back from - and my patio had been on my mind for quite a while now. They asked me to share how I would style my dream Florida Room so that I could enjoy it year round. Challenge accepted!

What I decided to create was a space inspired by modern nordic and bohemian design. I've been into a cleaner, more minimalist and airy color palette, so I wanted to stick to warm neutrals and white. I didn't want to stick to a traditional beach feel but create something that was more modern, yet very casual and inviting. Take a look at what I put together and I will go further in depth with my choices toward the end of the post.

 
Moodboard | Modern Nordic and Boho Inspired Outdoor Space | HelloLovelyLiving.com
 

1  |  Round Paper Lanterns* | Target

2  |  Sisal Rug* | Kohl's

3  |  Kilim Turkish Cotton Throw* | Terrain

4  |  Ivory Throw Blanket | Layla Grace

5  |  White Wire Chair* | One Kings Lane

6  |  Cactus Garden* | Overstock

7  |  Bertoia Side Chair* | Design Within Reach

8  |  Ferox Aloe | Weylandts

9  |  Whitewashed Wood Wall Mural | Burke Decor

10  |  Macrame Wall Hanging* | Urban Outfitters

11  |  Tribal Pattern Throw Pillow* | Wayfair

12 |  Boston Fern Hanging Basket* | Overstock

13  |  Pear Lantern* | Amara

14  |  Seafarer Medium Lantern* | Zinc Door

15  |  'Morocco' Pillow* | Nordstrom

16  |  Decorative Pillow Sea Foam | Etsy

17  |  Artificial potted cactus | Selfridges & Co.


18  |  Ink Hatch Pillow - Ink* | Casa 

19  |  Cameo Cushion Amethyst* | Houseology 

20 |  Seafarer Small Lantern* | Zinc Door

21  |  Mini Artificial Succulent* | Norsdstrom

22 |  Tealight Lantern* | Amara

23  |  Relax Rope Accent Pillow | Kirklands

24  |  Quilted White Pillow | CB2

25  |  Art Club Concept Cushion | Superette

26 |  Mini Artificial Succulent* | Norsdstrom

27 |  Two Toned Grey Cushion* | Target

28  |  Artificial potted cactus* | Selfridges

29  |  Bungalow Sofa* | Serena & Lily

30  |  Sunshine Accent Chair* | Dot & Bo

31  |  Reversible Uncover Tripod Table* | Amara

32  |  Wire Storage Table* | Luisaviaroma

33  |  Melati Hanging Chair* | Anthropologie

34  |  Macrame Hanging Planter* | Urban Outfitters

 
via Anne Sage


CREATING MY MOOD BOARD

Before I created my mood board, I put together a Pinterest board of all of the outdoor spaces that I wanted to get ideas from, then used those photos to pick out items that I wanted to incorporate into my space. Since this is a "dream" mood board, I kinda went wild with it (a tad overboard), so fair warning that similar items can be found at cheaper prices. I chose each item based on aesthetics, not price, so I do plan on using this mood board as inspiration to find more budget-friendly pieces or ideas for DIY projects.

Here's the breakdown of how I was able to accomplish creating a modern nordic and bohemian inspired space:


2 | PLANTS

On any given day, you can catch me obsessing over plants, so of course, they had to make an appearance in my Florida Room. Boston ferns are the perfect way to add lush greenery and that pop of color in this neutral space. They're also really easy to care for, so they're a perfect choice for me. I also had to include easy to care for succulents and cactus. I say the more plants the merrier, especially when the weather warms up. Bohemian spaces are all about that jungle vibe, so you can't overdo the plants. I'd say skip the fake plants and just go with the real deal. I've found that succulents and cactus are immune to my plant-killing tendencies, so I can't go wrong with them!


4 | NATURAL FINISHES + METALS

Creating a bohemian vibe called for different natural finishes and textures. For example, I chose a variety of finishes like this Sunshine Accent Chair* with a bamboo and wicker seat and this Whitewashed Wood Wall Mural made from reclaimed boards which has a myriad of different textures and stains. I also incorporated lighter shades of wood finishes like this Pear Lantern made from pine wood and this Reversible Uncover Tripod Table* in light ash and brushed metal in aluminum on the opposite side. The Seafarer Medium Lantern* and Seafarer Small Lantern* are made with a variety of natural materials: galvanized metal, fir wood, plywood, bamboo, and jute. I love that it has a gray tone to it, which can be seen repeating in this space. Other natural fibers can be seen in the macrame decor. The tripod legs of the Bungalow Sofa* and Sunshine Accent Chair* are also where that metal comes into play. For more metal on metal action, I chose the Wire Storage Table*, White Wire Chair*, and Bertoia Side Chair* for that clean modern look.


1 | MODERN MACRAME  

I knew that I wanted to add a boho touch to my outdoor space because I love modern macrame, a zillion plants, natural textures and finishes and a relaxed vibe. So, I added this Knotted Melati Hanging Chair* that is macrame perfection. Keeping with the macrame theme, I wanted to also include this Macrame Wall Hanging* that I thought would be perfect as a wall tapestry or to divide the space. Since this is my dream Florida Room after all, I couldn't go without this Macrame Hanging Planter* as well. Hanging plants are a must.


3 | MIX & MATCH SEATING

I wanted to incorporate a lot of seating, so I went in with a white Bungalow Sofa* with hairpin legs. I actually edited the sofa to have hairpin legs, so the sofa seen actually doesn't exist; The original sofa has a rattan base. I'm loving hairpin legs and thought how pretty it would be to use them as legs for a sofa. It would be great for the outdoors because it would be completely open and perfect for small spaces. They're also a good choice for the outdoors because animals or bugs can't hide under them and nest. The platform for the sofa would probably be some type of wood. I also love the look of wire chairs, so I also added those in to touch on the modern nordic feel I was going for. As you can see, since there are so many areas to sit, you can always create separate seating areas and move furniture around to change up the space entirely.


5 | FINISHING TOUCHES

I wanted to make sure to include a lot of lighting so that the space can also be used in the evening, so the lanterns on the ground level add that perfect touch along with the hanging Round Paper Lanterns*. Tons and tons of pillows are a must as well as varying patterns and colors, but keeping with a soft color palette. The Kilim Turkish Cotton Throw* and Ivory Throw Blanket are to keep warm and bundle up to when it gets cold. I also added a Sisal Rug* to complete the space because I love outdoor rugs and how they make a space feel like an outdoor living space. I can definitely see myself enjoying this space. Every. Single. Day. There would be no reason to stay indoors with how comfortable, relaxing, and welcoming it looks!

I think I accomplished what I wanted for this room and more. It's the perfect space for any occasion and it would definitely make me happy on those days where I just want to get some fresh air in the comfort of my third story porch. I love how everything came together and how it really incorporates everything I want in an outdoor space. Thank you to Douglas Elliman for inviting me to be a part of this challenge. If you are on the lookout for amazing properties across the US, be sure to check them out, and if you're in need for some inspiration, head over to their Florida page. When I did, it just reaffirmed why my husband and I want to relocate there. 

I hope this inspires you to create a mood board for your outdoor space. Not only will it help you get all of your ideas together, but it will seriously make your dream space more attainable because it'll make your vision come to life. If you create a mood board, I'd love to see it! 

So, what do you think? How would you decorate your dream Florida Room? I'd love to hear about it in the comments below!

Disclosure: Links that are marked with an * are affiliate links.